Quantcast
Channel: BPEL – AMIS Oracle and Java Blog
Viewing all 24 articles
Browse latest View live

Migrating your BPEL 1.1 process to BPEL 2.0 – SOA Suite 11gR1PS2 to PS3

$
0
0

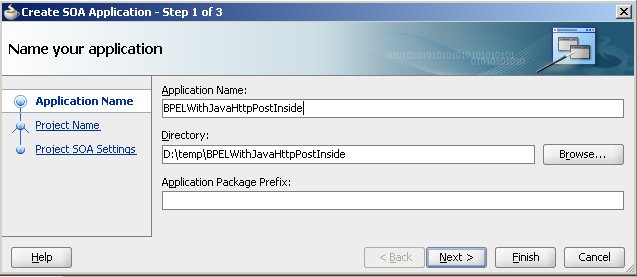
In my current project we just started creating BPEL 1.1 processes. Then SOA Suite 11gR1PS3 came along and gave use BPEL 2.0. As we are just in the early stages of development we decided to have a look at the impact of upgrading our already build BPEL 1.1 processes to version 2.0.

As there are no BPEL 2.0 upgrade tools we had basically two options. The first was to complete rebuild all our processes. Not a very good option to redo all the work. The second options was to manually upgrade the BPEL 1.1 definitions to 2.0. Expecting this to be less work we choose the second option.

The first step was to fool Jdeveloper into thinking a BPEL 1.1 process is actually BPEL 2.0.

1.       In the BPEL source file I changed two namespaces:
xmlns =”http://schemas.xmlsoap.org/ws/2003/03/business-process/” into xmlns=”http://docs.oasis-open.org/wsbpel/2.0/process/executable”
xmlns:xxx=”http://docs.oasis-open.org/wsbpel/2.0/process/executable”  into xmlns:bpel=”http://docs.oasis-open.org/wsbpel/2.0/process/executable”

2.       In the composite.xml  I added the version=”2.0” attribute to the bpel component  <component name=”name bpel process” version=”2.0”>

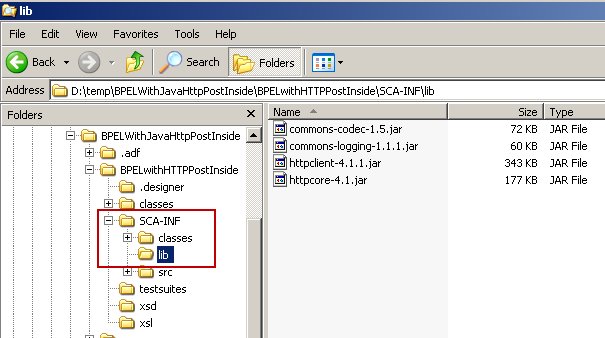
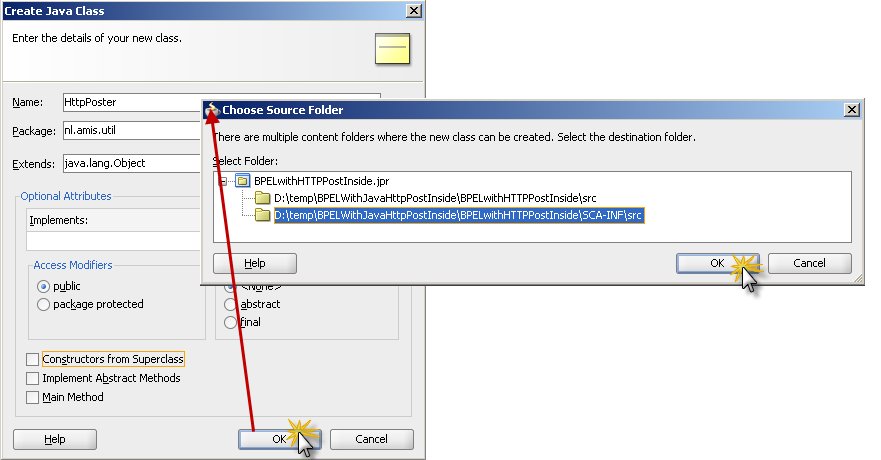
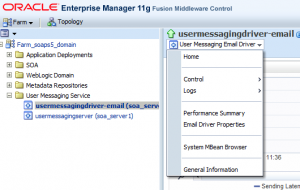
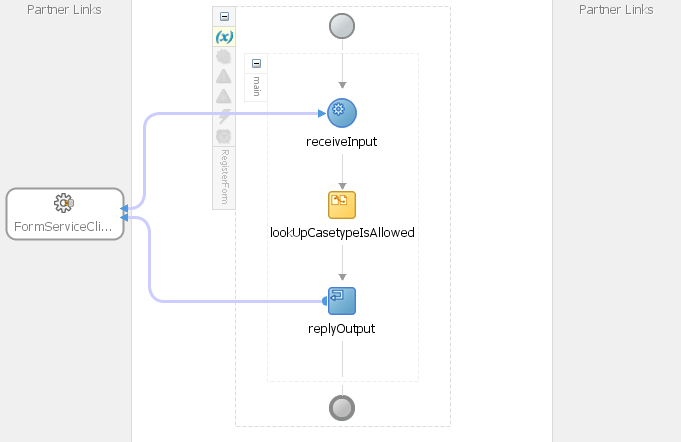
3.       Finally I closed JDeveloper, deleted the SCA-INF directory and restarted JDeveloper. The SCA-INF was created again. When I opened the bpel process in the editor it was recognized as a BPEL 2.0 process:

But it contained quit some errors. This was to be expected as there are differences between BPEL 1.1 and 2.0. I fixed the errors. The fixes I will discuss do not cover all possible errors that will arise when you upgrade to 2.0. I only described the ones I encountered.

  1. I clicked on all my partner links to check if all roles are still correct. Of the six processes I migrated only one partner link was corrupted and needed to be reassigned.
  2. Then I clicked on all invokes, replies and receives just to make sure the correct operation was still selected and the right variables still used. No problems here.
  3. The assignments (assign activity) needed some major fixing.In BPEL 1.1 if you look at the assign activity under the hood you will see this:

    [sourcecode language="xml"]</pre>
    </li>
    </ol>
    <pre><assign name="Assign1">
    <copy>
    <from variable=”inputVariable” part=”payload” query=”ns2:/StartRequest/ns2:procesId”/>
    <to variable=” start_InputVariable” part=”payload” query=”/ns6:/Parameters/ns6:procesId”/>
    </copy>
    <copy>
    <from expression=”concat(bpws:getVariableData(‘inputVariable’,’in’,’ns2:/StartRequest/ns2:procesId’,’ _tmp’))/>
    <to variable=” tempvalue” />
    </copy>
    </assign>
    [/sourcecode]

    In BPEL 2.0 a xsl variable notation is used. The above assignments now look like:

    [sourcecode language="xml"]
    <assign>
    <copy>
    <from>$inputVariable.payload/ns2:procesId</from>
    <to>$start_InputVariable.payload/ns6:procesId</to>
    </copy>
    <copy>
    <from>concat($inputVariable.in/ns2:procesId,’ _tmp’)</from>
    <to>$tempvalue</to>
    </copy>
    </assign>
    [/sourcecode]

    First I opened the assign editor for all assignments and closed it again (press ok). If you look at the source before and after, you will notice the contents of  the variable and part attribute have been moved to the correct location.

    The expression and query attribute have not been moved and are still there. You will have to do this yourself. Add them to the variable but remove the first level of the xpath as it is no longer not needed.

    IF you have assigned a XML fragment to a variable you need to do the following. Enclose the fragment inside a <literal> element.

    Check all the assignments if they are correct.

    1. You need to add an additional attribute to the catch element when you are catching faults. This can be a faultMessageType or faultElement. Open the catch fault editor and select the right one
    2. In BPEL the while condition is an attribute of the while element. In BPEL 2.0 this has become a child element instead. Remember you need to use the xsl variable format here also.
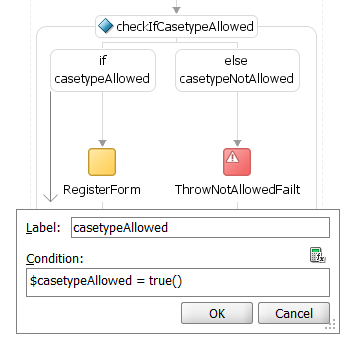
    3. The switch statement has been replaced by an if statement.
      1. Just rename the switch to if
      2. Make the condition attribute of the first case element a child element of the if element and change its a xsl variable format (see earlier).
      3. All other Case  elements become elseif’s. For the condition the same applies as explained before.
      4. otherwise becomes else.
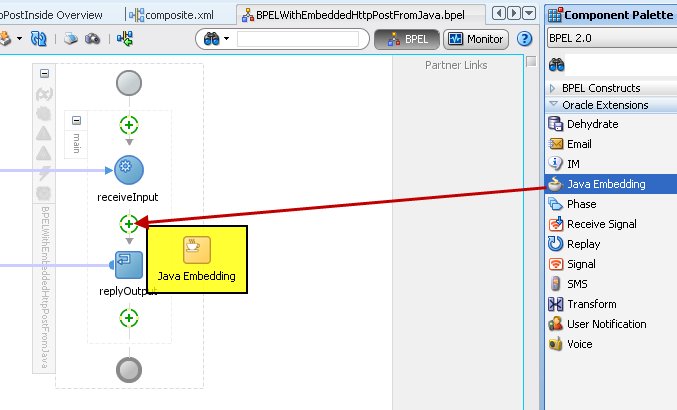
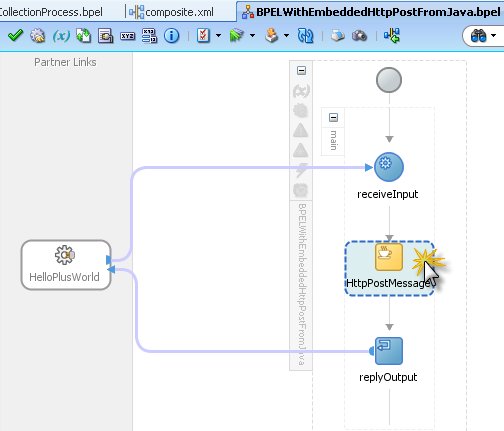
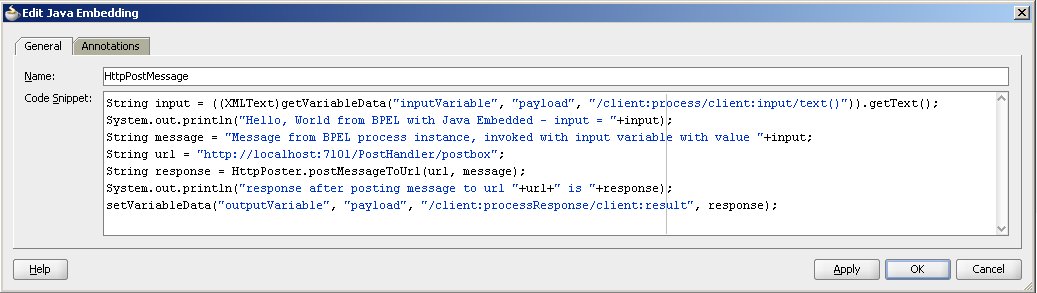
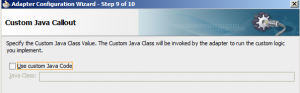
    4. I enclosed the Embedded Java activity element (bpelx:exec) by the extensionActicity element and removed the version attribute.
    5. The checkpoint  element can be replaced by the dehydrate element also enclosed by an extensionActicity element as it is a oracle specific bpel 2.0 extension like the embedded java activity.
    6. The terminate activity just needs to be renamed to exit.
    7. The until attribute of the BPEL 1.1 Pick/onAlarm element has become a child element in 2.0 and needed to be moved.
    8. Not all annotations are supported anymore. I commented some of them out for now as they were mainly for documentation purposes only.
    9. Unfortunately the skipCondition attribute is no longer supported.  I was a little disappointed about this although I can understand why it is removed. This attribute is just not part of the BPEL 2.0 standard. I had to add if/then/else constructions to mimic the same behavior polluting my once so beautiful BPEL processes.

    So we painted our donkey brown but is it a horse now?  Our transformed BPEL 1.1 process validates as a BPEL 2.0 process so it looks like it.  Now you can do some BPEL 2.0 refactorings to make it into a proper horse. Here are some suggestions:

    1. In BPEL 2.0 there is the notation of variable initialization. Where in BPEL 1.1 you need an additional assign activity to initialize a variable in 2.0 you can do this as part of the variable definition. So you can  make the BPEL process cleaner by moving the initialization to the definition part.
    2. The assign activity has some additional functionalities:
      keepSrcElementName
      (in BPEL 2.0 projects only): Select this option to toggle the keepSrcElementName attribute on the copy rule on and off. This option enables you to replace the element name of the destination (as selected by the to-spec) with the element name of the source.
      Change Rule Type
      (in BPEL 2.0 projects only): Select this option to change the type of the selected rule to one of the BPEL extension rules: bpelx:copyList, bpelx:insertAfter, bpelx:insertBefore, or bpelx:append.

    For six simple to moderate complex BPEL processes this cost me about a day and a half work. For our project it was not cost effective to automate this. We could have created  an xsl transformation to do parts of the migration. I wonder if you could fully automate this especially the refactoring part.


Batch Aggregation of files in BPEL process instances based on correlation

$
0
0

Remco is an interesting guy with unexpected ideas springing from a creative brain. He can make life interesting, challenging and puzzling. This time he had another interesting challenge – not all that weird to be honest. The challenge in short was:

Our invoicing system produces files that contain one or more invoice entries. Every entry describes an invoice for a certain company we do business with. There can be multiple invoice entries for the same company. The objective is to aggregate together all invoice entries for a company – potentially from many different file. For each invoice entry – some special processing involving service calls is required. Once all entries for a company have been collected and aggregated, some additional action is required – for example recording the company invoice aggregate in a database or in a file and call a webservice to perform additional processing. The files with invoices are produced over a period of a couple of hours. It is important that the processes performing the aggregation are reliable – they should not lose any entries.

The specific question we investigated is: can we solve this puzzle using Oracle SOA Suite 11g? And an early approach towards applying the SOA Suite’s capabilities to this challenge was based on BPEL’s correlation mechanism. In short: every company for which the batches contain invoice entries wil have an instance of a composite called InvoiceAggregator. This instance is carried by a BPEL component that has correlation configured on CompanyId. In our test set up, we have the company instance expire after 5 minutes: it will cease aggregation when it has not received new messages for a period of 5 minutes.

Composite InvoiceProcessor contains a File Adapter that reads the Invoice entries from files arriving in a specified directory. Each entry is passed to a Mediator that forwards it to a BPEL component. This BPEL component instantiates the company specific instance of InvoiceAggregator (if it does not already exist). Then it passes the invoice entry to that instance.

Composite InvoiceProcessor is stateless: after processing an individual invoice entry, it terminates (typically in a couple of 100ms). Composite CompanyAggregator is around for much longer – in our set up at least for 5 minutes and typically longer when multiple invoice entries arrive for the company.

Image

Note: this lay out is a simplification of the real challenge. The essence of the correlation based interaction is captured in this example however.

Stateful Composite CompanyInvoiceAggregator

The composite that runs as the stateful aggregator, processing incoming invoice entries for a specific company – CompanyInvoiceAggregator – consists of a single BPEL component that is wired to a simple outbound File Adapter component to write the final results to a file.

Image

The crucial machinery in this application is hidden away in the deceptively simple BPEL process CompanyInvoicesAggregator. This BPEL process has two ways in: one to instantiate the process instance for a particular company and another to receive an invoice entry for the company represented by the instance.

The Receive at the beginnin of the process is associated with operation Process on partner link CompanyInvoiceAggregatorService. This activity initiates the BPEL process instance. The process continues with the initialization of a few variables and the reply activity that sends a fairly meaningless response message. Why we have a Reply at all will become clear in a moment.

After the Reply – which concludes the first synchronous interaction with this process instance, the process continues. It enters a loop in which it executes a Pick – waiting for a message to arrive – which carries the next invoice entry for the company – or the time out to occur (currently set at 3 minutes for testing purposes).

Image

When a message with a new invoice entry arrives, the total amount for all company invoices is increased and another iteration of the loop is entered. However, when the time out occurs, the loop-flag is reset, the loop is terminated and the final invoice total is written to a file that aggregates all company aggregates. At that point, the process instance for a specific company is complete and will end.

The once really special element in this BPEL process is the onMessage branch in the Pick activity. That is where the running process instances receives an incoming message. Frequently, BPEL process either receive a message at the beginning of the process – to kick off the process – or as callback response to a invoke of an asynchronous service. This is something different: asynchronously receiving unsollicited messages into a running instance. BPEL is capable of this feat thanks to its unique feature of correlation. In short: the BPEL engine can assign a unique identifier to each process instance and it is capable of handing incoming messages to a particular instance, based on that unique identifier – or correlation id as the BPEL terminology is.

Three elements are required to get correlation working:

  • define the correlation set (the composite unique key) for the BPEL process, in terms of properties (note: there can be more than one correlation set in process)
  • specify on a Receive, Invoke or OnMessage activity that the instance should be identified and made available for correlation; at this point we also need to specify what the values are for the properties that constitute the correlation set; these values need to be derived from the incoming or outgoing message
  • configure Receive and OnMessage activities to accepted correlated messages; we need to specify how the values for the properties of the correlation set are found in the incoming messages that we want to correlate on

Let’s see how these three steps are implemented in the CompanyInvoiceAggregator composite application.

1. Define the correlation set

Image

The correlation set has a name and one or more properties. Each property has a name and a type. In this case, the correlation set is called CompanyAndBatchNameCorrelationSet and it has a single property: companyId of type integer.

2. Specify the start of correlation

This BPEL process is identified by the companyId. As soon as the request arrives for the process operation, handled by the Receive activity, should the correlation set be initiated and the process instance be registered with the engine for correlation. This is set up in the Receive activity, on its correlation tab:

Image

The correlation set is added in the correlation tab, to indicate that this Receive activity is related to that set. By setting the value of Initiate to yes we further indicate that this activity is responsible for setting the value of the correlation identifier (the unique key) for this process instance. When this Receive is complete, this instance is published for correlation. We also need to specify what the value is for the correlation identifier. We do this through a so called Property Alias – a mapping of an element in the incoming message that this Receive activity handles to a property in the Correlation Set. In this case, we map the companyId element in the invoiceRecord that is passed to the BPEL process to the property companyId in the correlation set.

3. Configure correlation on incoming messages for a running instance

Our BPEL process needs to receive additional invoice entry messages for this company. We use a Pick activity with an OnMessage branch. This OnMessage activity needs to participate in correlation too. It does not set the identity of the process instance – that is already done in the Receive activity – but it needs to specify that it wants to correlate and how the matching value can be read from the message is processes.

Image

It is important that initiate is set to no for this activity – only one activity can initiate a correlation set. The property companyId was set by the Receive activity, so the OnMessage knows what the companyId is in which it is interested. It should specify how that companyId is found on the CompanyInvoicesAggregatorRequestMessage that it is intent on receiving. A property alias is configured for property companyId, mapping it to the companyId element in the payload of the request message. This instructs the BPEL engine to pass the message to a BPEL process instance identified with the value for companyId found in the message.

With this configuration in place, we can deploy the composite and we could test it.

Stateless Composite InvoiceProcessor

Our second composite is not stateful. It reads a single Invoice Entry from a file, hands it over to a Mediator that forwards it to BPEL process. This BPEL process has a simple responsibility: make sure that the invoice entry is delivered in the instance of CompanyInvoiceAggregator that handles all invoice entries for the company specified in this invoice entry.

Image

This composite nor the BPEL process inside it are aware of correlation. This is important to realize. Even though the BPEL process will benefit from and make use of the correlation functionality built into the CompanyInvoiceAggregator composite, it is not actively aware of it or hooks into it. The InvoiceRecordDistributor simple invokes the Process operation on the CompanyInvoiceAggregator composite’s web service (1) to instantiate the company specific instance and then the operation processNextInvoiceRecord (2) to pass the InvoiceEntry itself.

Image

However, the first call, the invoke of the process operation, will fail on many occasions! The companyId is like a unique key for instances of the composite CompanyInvoiceAggregator and there can be only one instance of that composite for a specific company. Only for the very first invoice entry for a specific company will the call to process on the CompanyInvoiceAggregator succeed. For all subsequenty invoice entries, this call will fail. The BPEL engine will throw a fault because it cannot execute the call to process successfully, because that would result in a second instance with the same unique key value.

However, we do not really mind that the call fails. The only reason for making the call to operation process is to ensure that an instance for the companyId is created. And the only reason for this call to fail (well, the main reason) is that the instance already exists. Which is what we tried to establish, so that is okay.

The scope that makes the call to the process operation has a fault handler that will handle the fault that occurs when an instance for the companyId already exists. It needs to do absolutely nothing, as it is perfectly alright for the company instance to already exist.

After either a successful or a failed call to process on CompanyInvoiceAggregator, the operation processNextInvoiceRecord is invoked. Thanks to correlation, the invoiceEntry record is passed to the BPEL instance that is identified by the companyId value that is contained in the record.

And… Action

The composite InvoiceProcessor is configured to read files with InvoiceEntries from a directory on the SOA Suite server’s file system. For example:

Image

This file is copied to the configured incoming directory:

Image

And removed to be processed after a few seconds. A copy of the file is written to an archive directory:

Image

Processing is underway meanwhile. No outcomes are produced – all company specific instances are waiting for at least three minutes before they terminate.

After a few minutes – well, three to be exact – the following output is produced -with the aggregated invoice amount toal per company:

Image

When we check the instances for the CompanyInvoiceAggregator, we will find more than the 8 instances that produced a line in the output file:

Image

There are many instances that have faulted: one for every second or subsequent invoice entry for a certain company. Because every second or subsequent invoice entry for a company tries to instantiate a correlation id that already exists, it will produce a fault. That fault is caught and the calling InvoiceProcessor instance continues. However, the SOA Suite registers the faulted CompanyInvoiceAggregator as well.

Note that this composite has been adorned with a composite sensor – for the company id. This means we can search instances on the company id- for example for company id equals 4.

The message flow trace for the successfully completed instances looks like this:

Image

The BPEL flow for an instance of CompanyInvoicesAggregator is shown here. After the receive, assign and reply is the start of the scope UntilTimeOutWaitForMoreInvoices. When the invoiceRecord message is received, it can be correlated on the companyId (4) that it contains, to the already running instance.

Image

The fault registered for the failed instances – tried to initiate with a correlation id value that is not unique – can be inspected too:

Image

Drilling into a failed instances provides some insight in what went wrong:

Image

The fault is described as “Conflicting Receive. A similar receive activity is being declared in the same process.” It is not entirely clearly worded, but it is clear that a unique violation on unique identifier has occurred.

Image

Resources

JDeveloper/SOA Suite 11gR1 PS 2 Projects: CompanyInvoiceProcessorAndAggregator.zip

Getting started with your career (in Dutch)

$
0
0

Als bezoeker van deze blog ben je bezig met het maken van mooie oplossingen en nieuwe uitdagingen op technisch gebied. AMIS nodigt je uit om ons team te komen versterken. AMIS wil je op het gebied van Oracle en Java uitdagen de volgende stap in je carriëre nemen.

AMIS merkt al enige maanden dat de markt voor Oracle en Java opdrachten aan het aantrekken is en maakt dat concreet met het uitvoeren van innovatieve opdrachten.

Om je een beeld te geven van het werk bij AMIS volgt hieronder een lijst met de trajecten waar we de afgelopen maanden aan gewerkt hebben.

  • OSB / SOA Suite implementatie bij een grote informatieverwerkende organisatie.
  • Realisatie in ADF 11g van een backend applicatie voor een internetwinkel.
  • Realisatie van een SAAS oplossing op basis van Hibernate, Seam en RichFaces.
  • Realisatie van een medisch registratiesysteem in ADF.
  • Advies op het gebied van het gebruik van ADF 11g in combinatie met JHeadstart voor een energiebedrijf.
  • Realisatie van een SOA / BPEL implementatie voor een pensioenfonds.
  • Realisatie van een administratiesysteem voor een verzekeraar buiten Nederland (EU) in ADF 11g en JHeadstart.
  • Oracle XML DB implementatie voor een grote bank.
  • Realisatie van een SOA Suite / BPEL oplossing voor een grote logistieke leverancier.
  • Proof of concept ADF 11g bij een groot adviesbureau.
  • Oracle APEX / GIS implementatie bij een groot adviesbureau.
  • SOA / BPEL traject bij een grote gemeente.
  • Oracle WebCenter, ADF 11g, SOA Suite 11g en OSB traject bij een grote wereldwijde dienstverlener.
  • Webservice koppeling met ADF en JAX WS voor een grote gemeente.
  • Advies en implementatie van een professionele ontwikkelstraat bij een IT-bedrijf
  • ..meer

Kom werken bij AMIS, kijk http://www.amis.nl/vacatures

Eva van der Kleij. Neem contact met me op via info@amis.nl of bel 030-6016000

We zoeken Oracle, SOA, Java developers die als medewerker van AMIS de vervolgopdrachten gaan uitvoeren. En denk niet direct dat je hiervoor te weinig kennis of ervaring hebt: jouw toekomstige ervaren collega’s doen niets liever dan jou verder helpen. Ons trainingsprogramma voorziet in een grote diversiteit aan opleidingen en tijdens onze interne kennissessies kun je op veel terreinen iets van je collega’s opsteken. Kom ons eens van wat dichterbij bekijken en maak een afspraak voor een kennismakingsgesprek via Eva van der Kleij op info@amis.nlof bel naar op 030-6016000. Bel ons ook als je meer wilt weten over werken bij AMIS of een van de onderstaande functies. Concreet hebben we de volgende vacatures:

Wellicht sta jij volgende maand met een artikel op deze blog, schrijvend over de nieuwe dingen die je hebt geleerd of toegepast.

Tot ziens bij AMIS!

Keeping your process clean: Hiding technology complexity behind a service

$
0
0

This blog will explain how you could abstract technology behind a service so your main process will be kept clean of all kind of technology pollution like exception handling, technology adapters and correlation.

In this case you need to interact with a backend database. First you need to start some processing by calling a PL/SQL routine. After some time you will receive a callback containing output values.  Message queueing is used as preferred transport for the callback. You could use a web service callout from the database but this is not the best thing to do.  Error handling at the database side tends to be pretty tedious and could result in hanging database sessions.

The service to hide the complexity is implemented as a composite with an asynchronous interface/WSDL. The main process will only interact with this composite. To make things a little more complicated the composite has been split in two composites. The receiving of the messages from the queue is implemented as a separate composite called the dispatcher. It is responsible for receiving the messages and sending them to the right place. In the future this dispatcher could process new message types.

Zooming in and adding some more details the implementation looks like:

The dispatcher uses a mediator to do some on the fly transformations and to decide to whom to post the message based on the message content.  Correlation is used between the asynchronous service composite and the dispatcher to send the message to the correct instance so it will eventually be returned to the right main process.

Technical error handling like RemoteFaults because of unavailability of the database are handled inside the asyn service. If you expect the response message from the database within a certain amount of time you can add an onAlarm or use a Pick instead of a Receive.

There is one error situation more complicated to handle.  Suppose the database post a message to the queue and no async service process instance could be found to correlate with. As by design the BPEL engine will create an empty instance for you hoping you will actually create the real instance yourself in the near future that can continue processing the response message. That is not what you want. So you want to be sure before you actually call the async service from the dispatcher an instance exists it can correlate with avoiding ‘ghost’ instances.

A solution is to do a pre check inside the dispatcher. You can uniquely identify an async service instance by adding a sensor (value).  The soa management API provides a locator with which you can search composite and component instances based on filters. A filter can contain a sensor (value).  Here is some sample code:

[sourcecode language="java"]
String flowId = (String)getVariableData("flowId");         
String PROVIDER_URL = (String)getVariableData("PROVIDER_URL");        
String SECURITY_PRINCIPAL = (String)getVariableData("SECURITY_PRINCIPAL");        
String SECURITY_CREDENTIALS = (String)getVariableData("SECURITY_CREDENTIALS");        
 
java.util.Hashtable jndiProps = new java.util.Hashtable();              

jndiProps.put(javax.naming.Context.PROVIDER_URL,PROVIDER_URL);              
jndiProps.put(javax.naming.Context.INITIAL_CONTEXT_FACTORY,"weblogic.jndi.WLInitialContextFactory");              
jndiProps.put(javax.naming.Context.SECURITY_PRINCIPAL, SECURITY_PRINCIPAL);              
jndiProps.put(javax.naming.Context.SECURITY_CREDENTIALS, SECURITY_CREDENTIALS);              
jndiProps.put("dedicated.connection", "true");                

boolean flowFound = false;
oracle.soa.management.facade.Locator locator = null;     

try {     
    locator = oracle.soa.management.facade.LocatorFactory.createLocator(jndiProps);     
    java.util.List<oracle.soa.management.util.SensorFilter> sFilterList = new java.util.ArrayList<oracle.soa.management.util.SensorFilter>();     
    oracle.soa.management.util.SensorFilter sFilter =   new oracle.soa.management.util.SensorFilter("flowId",      
            oracle.soa.management.facade.Sensor.SensorDataType.STRING, oracle.soa.management.util.Operator.EQUALS,      
            flowId);     
    sFilterList.add(sFilter);     

    oracle.soa.management.util.CompositeInstanceFilter filter = new oracle.soa.management.util.CompositeInstanceFilter();     
    filter.setSensorFilter(sFilterList);     
    filter.setState(0);
    filter.setCompositeName("DocGenService");
    java.util.List<oracle.soa.management.facade.CompositeInstance> obInstances = locator.getCompositeInstances(filter);     

    if (obInstances != null && obInstances.size()==1) {
        addAuditTrailEntry("CompositeInstance found.");
        oracle.soa.management.facade.CompositeInstance compositeInstance = obInstances.get(0);
        oracle.soa.management.util.ComponentInstanceFilter componentInstanceFilter = new oracle.soa.management.util.ComponentInstanceFilter();             
        java.util.List<oracle.soa.management.facade.ComponentInstance> cis = compositeInstance.getChildComponentInstances(componentInstanceFilter);
        if (cis != null && cis.size()==1) {
          if (cis.get(0).getNormalizedState() == 0) {            
             addAuditTrailEntry("DocGenService flow found with flowId: "+flowId);
             flowFound = true;
          }             
        }
    }
} catch (java.rmi.RemoteException re) {     
} catch (Exception e) {     
} finally {     
   locator.close();     
}      
setVariableData("found",(flowFound? "J":"N")) ; 
if (flowFound) {
   addAuditTrailEntry("DocGenService flow found with flowId: "+flowId);
else
   addAuditTrailEntry("DocGenService flow **not** found with flowId: "+flowId);
}
[/sourcecode]

In this sample code the flowId is the unique identifier/sensor. This code is implemented inside a BPEL Java embedded activity.

Depending on the message load this approach could be a little expensive. So instead of using the soa management API you can directly query the SOAINFRA database. 

[sourcecode language="sql"]
FUNCTION PROCESS_EXISTS(
    P_FLW_ID    IN NUMBER,
    P_BPEL_NAME IN VARCHAR2)
  RETURN INT
IS
BEGIN
  DECLARE
    CURSOR C_PCS_I (B_FLOW_ID IN VARCHAR2, B_BPEL_NAME IN VARCHAR2)
    IS
      SELECT CXCI.CIKEY
      FROM FUSION_SOAINFRA.CUBE_INSTANCE CXCI,
        FUSION_SOAINFRA.COMPOSITE_SENSOR_VALUE CSV
      WHERE CXCI.CMPST_ID     = CSV.COMPOSITE_INSTANCE_ID
      AND CSV.SENSOR_NAME     = ‘FLOWID’
      AND CSV.STRING_VALUE    = B_FLOW_ID
      AND CXCI.COMPONENT_NAME = B_BPEL_NAME
      AND CXCI.STATE          = 1;

    R_PCS_I C_PCS_I%ROWTYPE;

  BEGIN
    OPEN C_PCS_I(B_FLOW_ID => P_FLW_ID, B_BPEL_NAME => P_BPEL_NAME);
    FETCH C_PCS_I INTO R_PCS_I;
    IF C_PCS_I%FOUND THEN
      CLOSE C_PCS_I;
      RETURN 1;
    END IF;
    CLOSE C_PCS_I;
    RETURN 0;
  END;
End Process_Exists;

[/sourcecode]

If you wonder why I return an integer instead of a boolean. This has to do with the fact the database adapter cannot handle Boolean return values and will wrap them as integers anyways.

Introduction of BPEL 2.0 forEach activity – valuable loop and standard based successor to FlowN

$
0
0

BPEL 2.0 introduced the forEach activity – similar to for [-loop] found in many programming languages. Oracle SOA Suite 11g adopted BPEL 2.0, first in run time (PS2) and later in Design Time (JDeveloper) as well (PS3 an beyond). For BPEL processes created using BPEL 2.0, forEach is a looping mechanism – similar to repeatUntil and while – and also the successor to the proprietary Oracle extension to BPEL 1.x called FlowN. In that latter capacity, forEach is the activity that enables parallelism in BPEL processes to a dynamic degree.

The well known Flow activity also supports parallelism – but only for a static number of branches, known at design time. FlowN (1.x) and forEach (2.0) add the ability to execute a scope a dynamic number of times, determined at run time. Image

For example when an operation needs to be performed on multiple elements in a collection, such as all order lines in an order or all persons in a travel booking, forEach is valuable – especially when it makes sense to perform the operation on multiple elements at the same time.

Note however that parallelism in BPEL is a relative concept: a single BPEL process instance is never operated on in more than one JVM thread, so there is no real parallel execution at CPU level.

However – when asynchronous activities are ‘waiting other activities can be performed ‘in the mean time’. Examples of asynchronous activities are Wait, Receive (for a reply to the invoke of an asynchronous service, Pick (onMessage and/or onAlarm).

Image

When the forEach scope contains such asynchronous actions, it can provide parallel execution by executing the scope for the next element in the for-loop while the previous element’s iteration is waiting for an activity to continue or complete.

Here follows a simple example of using the forEach activity to implement a BPEL process (BPEL 2.0) that calculates the factorial for the number that was passed in the request. To refresh your memory:

Image

A recursive solution with BPEL would be possible, but very expensive. A simple solution based on a loop is presented below. Note that a similar solution can be created using repeatUntil (also introduced in BPEL 2.0) and while.

The complete process is implemented as follows:

Image

The variables in this process are defined as follows:

Image

  • an inputVariable that contains an input element of type integer; this is the factorial operand, the x in y= x!
  • the outputVariable, with a result element also of type integer that contains the outcome of the factorial calculation: the y in y = x!

The first step in the process, after receiving the request, is the initialization of the outputVariable. The result is set to 1. Because of this initialization, we can use the outputVariable for calculating every next iteration’s outcome, as you will see in a moment. First the Assign activity:

Image

Now the forEach activity. The first definition of this activity consists of the name of the activity, the name of the Counter (or index variable) and a checkbox to indicate whether the BPEL engine should attempt parallel execution (in this case that does not make sense). The Counter Name will be used to create a variable – $index in this case – that is available in the scope inside the forEach loop:

Image

On the Counter Values tab the loop is configured. The start value for the counter ($index) is specified through an XPath expression – which can be a literal as is the case here. The final value of the counter is also set using an XPath expression. Frequently, this value will be derived as the count of the number of elements of a specific type in the request message. In this case we need the counter to iterate from 1 to the number sent in the request message as the factorial operand:

Image

The only other activity in this process is the Assign activity inside the forEach scope where the factorial is calculated in each iteration:

Image

In every iteration, the factorial intermediate result is calculated by taking the result from the previous iteration and multiplying it with the current value of $index, the iteration counter. The result is stored in the result element in the outputVariable. When the forEach is done, the result is stored in the right location for returning it to the invoker.

Invoking the Factorial service returns the correct result – not surprisingly of course:

Image

The audit flow is more interesting than the fact that 5! equals 120:

Image

We clearly see how Scope1 is executed multiple times – once for every iteration of forEach and every value of $index.

True Parallelism using forEach

We will now look at a simple example of parallel execution using forEach. The forEach scope in this example contains an synchronous activity – a Wait that can last more than 3 seconds. When this scope is executing the Wait for a specific iteration, the BPEL engine can start processing the next iteration meanwhile. And when that one starts to wait, it can start the next iteration’s scope as well.

Image

In this case, the forEach activity is explicitly configured to do parallel execution when appropriate:

Image

The Counter has been configured to iterate from 1 to the number of waits that is specified in the request message:

Image

The Wait is simple. Its most interesting aspect is that the duration is derived using an XPath expression. The inputVariable contains the wait time in seconds. This value is used to construct an expression according to the required format: P#Y#M#DT#H#M#S. In this case, the number of seconds to wait is specified in the durationOfWaitInSeconds elements in the inputVariable. This number if combined with a fixed indication of 0 hours and 0 minutes:

Image

If we deploy this application and invoke it with 5 for numberOfWaits and 6 for the durationOfWaitInSeconds, we could expect a total execution time of just over 30 seconds in the case of a sequential execution:

Image

However, because the BPEL process includes the forEach activity that we have configured to support parallel execution, we may have hope for a shorter execution time.

The Flow Trace indicates that in this case the composite instance completed in about 10 seconds. Clearly, some parallel execution must have taken place in order to get from the sequential value of 30+ seconds to the actual 10 seconds.

Image

The visual flow makes it fairly clear what happened:

Image

Clearly, the scopes were executed in parallel. “If all the scopes do is wait, they may as well do it all at the same time.”

Developing and deploying Java Embedding activity in BPEL 2.0 in SOA Suite 11g calling a custom Java Class that has dependencies on 3rd party libraries

$
0
0

Java Embedded activity can call a custom Java class that relies on 3rd party Java libraries. This means that a lot of existing functionality from the Java open source community is at the disposal of the BPEL developer. This article shows a simple example of developing and deploying a BPEL process that uses Java Embedded Activity that calls a custom Java Class that uses Apache HttpClient to make Http POST calls. The article demonstrates how to develop the BPEL process, the Java Embedded activity, Java Class and how to deploy the SOA Composite application. It also presents the results of running the composite application.

Steps for a simple, straightforward demonstration:

1. Create SOA Composite application in JDeveloper 11g – based on the BPEL template

Image

Image

Image

2. Create the directory Application_Root\project\SCA-INF\lib

3. Copy 3rd party libraries to the directory created in the previous step

Image

4. Create the custom Java Class – in the SCA-INF\src directory

Image

The code of this Java Class is the following – inspired by a previous blog article: http://technology.amis.nl/blog/15098/create-simple-java-application-to-post-json-message-to-cometd-bayeux-channel-using-apache-httpclient-and-maven-style-netbeans-project.

[code language="java"]
package nl.amis.util;

import java.io.BufferedReader;
import java.io.IOException;
import java.io.InputStreamReader;
import java.io.UnsupportedEncodingException;

import org.apache.http.HttpResponse;
import org.apache.http.client.methods.HttpPost;
import org.apache.http.entity.StringEntity;
import org.apache.http.impl.client.DefaultHttpClient;

public class HttpPoster {

public static String postMessageToUrl(String url, String message) {

DefaultHttpClient httpClient = new DefaultHttpClient();
String response;
try {
response = postToURL(url, message, httpClient);
} catch (UnsupportedEncodingException e) { response = e.getMessage();
} catch (IOException e) {
response = e.getMessage();
}catch (RuntimeException e) {
response = e.getMessage();
}
httpClient.getConnectionManager().shutdown();
return response;
}

private static String postToURL(String url, String message, DefaultHttpClient httpClient) throws IOException, IllegalStateException, UnsupportedEncodingException, RuntimeException {
HttpPost postRequest = new HttpPost(url);

StringEntity input = new StringEntity(message);
input.setContentType("application/json");
postRequest.setEntity(input);

HttpResponse response = httpClient.execute(postRequest);

if (response.getStatusLine().getStatusCode() != 200) {
throw new RuntimeException("Failed : HTTP error code : "
+ response.getStatusLine().getStatusCode());
}

BufferedReader br = new BufferedReader(
new InputStreamReader((response.getEntity().getContent())));

String output;
StringBuffer totalOutput = new StringBuffer();
System.out.println("Output from Server .... \n");
while ((output = br.readLine()) != null) {
System.out.println(output);
totalOutput.append(output);
}
return totalOutput.toString();
}

}

[/code]
5. Add the 3rd party library JARs to the project definition in JDeveloper:

Image

6. Create the Java Embedding activity in the BPEL process

Image

7. (optionally rename the activity) and Double click the activity to start editing the Java snippet

Image

Image

[code language="java"]
String input = ((XMLText)getVariableData("inputVariable", "payload", "/client:process/client:input/text()")).getText();
System.out.println("Hello, World from BPEL with Java Embedded - input = "+input);
String message = "Message from BPEL process instance, invoked with input variable with value "+input;
String url = "http://localhost:7101/PostHandler/postbox";
String response = HttpPoster.postMessageToUrl(url, message);
System.out.println("response after posting message to url "+url+" is "+response);
setVariableData("outputVariable", "payload", "/client:processResponse/client:result", response);
[/code]

8. Add import statements for the non-JKD classes used in the Java snippet

Image

9. Deploy the SOA Composite applications.

Note: all Java classes in SCA-INF/src and all JAR files in SCA-INF/lib are included in the SAR:

Image

10. Test-run the BPEL process through its Web Service interface

The Java snippet reads an input variable, writes some logging to the console, passes the value of the input variable to the custom Java class that performs an HTTP POST request (handled by an extremely simple Servlet that does nothing but write the request contents to the console and return a standard response). This response is put on the outputVariable by the Java snippet.

When making this call to the BPEL process:

Image

This output is found in the SOA Suite console:

Image

And the output from the Servlet is

Image

Finally the response from the BPEL process – including the response from servlet invoked by the Java snippet:

Image

Resources

Download a zip-file with the SOA Composite application and the extremely simple Servlet project: BPELWithJavaHttpPostInside.zip.

Fusion Middleware 11gR1 – Patch Set 5 is available (at last) – First impressions

$
0
0

It had been announced at Oracle Open World 2011 and sort of promised for December 2011 – a promise or at least a suggestion reiterated in early December even. But for whatever reason, it slipped – not shipped – and Christmas break that perfect time of the year for playing with new software came and went. Now at last, it has arrived. As of midnight CET on 22nd February, PS5 (11.1.1.6) was published on OTN and eDelivery (https://edelivery.oracle.com/EPD/Download/get_form?egroup_aru_number=11493752) for download.

One of the reasons for the delay was the certification of FMW 11gR1 PS5 with Fusion Applications that was done over the last few months. Apart from the additional wait time (that is now over), this is quite good and important news: when Fusion Applications certifies software components, they put those components through very rigorous and extensive tests. Additionally, when Fusion Applications adopt a specific release – even a PS release – it makes that release more important to Oracle. So we now know that PS 5 has both been tested to the max and is of strategic importance to Fusion Applications and thereby to Oracle. Adopting PS5 for us mere mortals is therefore a safe bet – safer than some other PS or even major releases may have been.

Oracle states that PS5 is not a major release with lots of new functionality – but still, a lot of interesting stuff was made available, including functionality previously only available in intricate ways (for example Feature Pack for PS4, BPM customers that politely asked support etc.) that is now accessible in an easier way.

So there I was, tracking Twitter, tweeting a little myself and downloading, downloading and more downloading:

Image

And of course: browsing through the documentation library (http://t.co/fyV6HAHM) and comparing the 11.1.1.5 documentation with the 11.1.1.6 release to find differences and hence new features.

Some early impressions and finds from the documentation:

What’s New sections in Documentation

Installing

As the software downloads started to roll in, I started to install as well. JDeveloper 11gR1 PS5 obviously

Image

with the SOA, WebCenter and BPM extensions.

Image

In the SOA BPEL Editor I discovered the entrance point for one of the new features: BPEL Component level testing. More on that feature at a later moment.

Image

Proces email with the new UMS adapter of SOA Suite PS5

$
0
0

With the release of Soa Suite Patch Set 5 we can now try out the new UMS adapter. UMS stands for User Messaging Service but in this case it only supports email. The UMS adapter allows you to listen for new mail or send a mail from a service component. Combined with BPEL it’s now relative  easy to process email bodies or attachments. Remember that in PS5 the UMS adapter is still a  preview version so you can’t claim support and you can only use the Oracle forums for your ums questions.

It’s important to know that the UMS adapter does not work like a JMS topic or like EDN. So you can’t have two UMS adapters which are polling on the same mailbox.

In this blogpost I will show you how to setup and configure UMS, Listen plus send a mail and handle attachments.

We start with configuring our SOA Suite domain.

1st step is to copy two UMS libraries to your SOA Suite domain folder. Copy sdpmessagingclient.jar and sdpmessagingcommon.jar to the lib folder of the SOA Suite WebLogic Domain. You can find these jars at MiddlewareHome\Oracle_SOA1\communications\modules\oracle.sdp.client_11.1.1

2nd Install the UMS resource adapter.  Open the WebLogic Console and deploy the UMSAdapter.rar, you can find this adapter at MiddlewareHome\Oracle_SOA1\soa\connectors . Make sure you targeted this Resource Adapter to the SOA managed WebLogic server. And restart the SOA Suite Server.

3rd Check if the usermessagingdriver-email and usermessagingserver applications are active and targeted to the to the SOA managed WebLogic server. You can check this in the deployments of the weblogic console.

4th Configure the UMS Email driver.  For this we need to go the Enterprise Manager application. When everything is Ok you should see the User Messaging Service. Here we can select usermessagingdriver-email and in the menu we can go the Email Driver Properties.

Here we can set some defaults, like the default mail address, Cost and Speed ( cpu priority )

The UMS settings for outgoing mail.

The incoming settings are more complex because I will read two mail accounts, this is because I need one mail account for every polling UMS adapter.

To make this work I can use a “,” between the values so for IncomingMailIDs I use this as value soa@local.nl,soa2@local.nl , do the same for IncomingUserIDs = soa,soa2  and for the IncomingUserPasswords, I use CleartextPassword and also use a “,” between the passwords.

Restart the SOA Suite server.


At last we must enable the UMS adapter in JDeveloper.  Go to the JDev11.1.1.6\jdeveloper\integration\seed\soa\configuration folder and open the soa-config.xml. Find the adapterType with this ${UMS_ADAPTER_COMPONENT_NAME_L}  as name and remove the preview = true attribute. Now You will see the new UMS adapter in your SOA Component Palette.


In the next part we can finally try this out.

Let’s start with an easy one. Sending a mail from a composite. For this we need to drag the UMS adapter to the External Reference of the Composite.

Don’t change Connection JNDI name.

Choose for Outbound Send Notification. You can choose to receive the Mail Message Id as response, else it will be One Way.

Provide the Mail Header settings.

For Message Schema you got 3 options ( this talks about the mail body ) , off course Opaque, Message is a big String or based on a XML Schema.


Next we can take a look at incoming part of the UMS adapter. Drag the UMS adapter to exposed Services side of the composite.

Don’t change the default Connection JNDI Name

Choose Listener as Operation Mode, Polling does not work in this Preview Adapter and the UMS email driver already polls every few seconds.

Provide the mail adress this must match with your incoming UMS configuration.

Also provide the message type.


We can also define a message filter which can accept or ignore the incoming mails. The pattern string should be a java regexp. To test this pattern you can use this url  http://www.regexplanet.com/advanced/java/index.html

Too bad this feature does not work yet in this technical preview.


And also you can do a custom Java Callout ( I didn’t test it and don’t know the possibilities of this feature).


To test this I need to add the employee xml in the body of the mail ( not as attachment)  and send it to soa@local.nl. As response I will get a mail.

The request I will receive in SOA Suite.

And the response


Last part of this blogpost is about, how to handle mail attachments.

For this I will use the second mail address soa2@local.nl and also change the message type to String. A BPEL service component will write these attachments to a server location.

This is the request I received in the BPEL component. You can see that we only get a reference to the attachments.

So in BPEL we need to use a ForEach to handle every attachment and write this to a file.

To load the attachment and assign it to the file adapter input variable I need to use ora:getAttachmentContent

<assign name=”AssignInput”>
<copy>
<from>ora:getAttachmentContent(‘ReceiveMail_InputVariable’,'body’
,’/ns3:message/ns3:attachment/ns3:Attachment[$ForEachCounter]‘)
</from>
<to>$InvokeWriteFile_InputVariable.opaque</to>
</copy>
</assign>

and this leads to two files.

Here you can download the UMS workspace https://github.com/biemond/soa11g_examples/tree/master/UmsSOA


Uitnodiging: Kom kennismaken met AMIS

$
0
0

Hierbij nodigen we je uit om met ons kennis te komen maken.

Ben jij een (junior) Oracle consultant die een stap verder wil maken? Wil je verder groeien en ontwikkelen tot principal consultant? AMIS geeft je de kans om die stap te zetten.  Bij ons krijg je de ruimte om te experimenteren én te leren samen met de experts op je vakgebied.

Vacatures bij AMIS servicesLaat ons in een vrijblijvend gesprek vertellen welke mogelijkheden we je kunnen bieden. Neem voor een afspraak met een van onze consultants contact op met Eva.van.der.kleij@amis.nl of bel haar op 030-6016000. Je bent van harte welkom.

AMIS merkt dat haar concept van hoogwaardige en kennisintensieve dienstverlening erg succesvol is. Onze toekomst ziet er erg aantrekkelijk uit met interessante opdrachten bij toonaangevende klanten. Vandaar dat we op zoek zijn naar uitbreiding van ons team.

Denk niet direct dat je hiervoor te weinig kennis of ervaring hebt: jouw toekomstige ervaren collega’s doen niets liever dan jou verder helpen. Ons trainingsprogramma voorziet in een grote diversiteit aan opleidingen en tijdens onze interne kennissessies kun je op veel terreinen iets van je collega’s opsteken. Concreet hebben we de volgende vacatures:

Wellicht sta jij volgende maand met een artikel op deze blog, schrijvend over de nieuwe dingen die je hebt geleerd of toegepast.

Om je een beeld te geven van het werk bij AMIS volgt hieronder een lijst met de trajecten waar we de afgelopen maanden aan gewerkt hebben. We vertellen je graag in een persoonlijk gesprek meer over deze trajecten.

  • OSB / SOA Suite implementatie bij een grote informatie verwerkende organisatie.
  • Realisatie ADF 11g van een backend applicatie voor een pensioenfonds.
  • OSB / SOA / BPEL oplossing voor een logistieke dienstverlener.
  • Procesoptimalisatie met Oracle BPEL en invoering van BPM bij een financiële dienstverlener in Nederland.
  • Realisatie van een medisch registratiesysteem in ADF.
  • Advies op het gebied van het gebruik van ADF 11g in combinatie met JHeadstart voor een energiebedrijf.
  • Realisatie van een SOA / BPEL implementatie voor een pensioenfonds.
  • Realisatie van een administratiesysteem voor een verzekeraar buiten Nederland (EU) in ADF 11g en JHeadstart.
  • Oracle XML DB implementatie voor een grote bank.
  • Realisatie van een SOA Suite / BPEL oplossing voor een grote logistieke leverancier.
  • Proof of concept ADF 11g bij een groot adviesbureau.
  • Oracle APEX / GIS implementatie bij een groot adviesbureau.
  • SOA / BPEL traject bij een grote gemeente.
  • Oracle WebCenter, ADF 11g, SOA Suite 11g en OSB traject bij een grote wereldwijde dienstverlener.
  • Webservice koppeling met ADF en JAX WS voor een grote gemeente.
  • Advies en implementatie van een professionele ontwikkelstraat bij een IT-bedrijf
  • ..meer

Tot ziens bij AMIS!


Oracle SOA Suite 11g PS 5 introduces BPEL with conditional correlation for aggregation scenarios

$
0
0

Not too long ago, one of my customers had the following requirement: a file with invoice-entries has to be processed each night; for all invoice entries for the same customer, we would like to start a single BPEL process instance that aggregates the entries and creates a single invoice. To process the entire file, one BPEL process instance needs to be created for every unique customer who has invoice entries in that file. Note however that the Inbound File Adapter knows nothing about the customers or about previously started process instances, it will simply invoke a BPEL process ‘service’ for each line it processes.

image

The figure illustrates the situation. Note however that the invoice entries need not be sorted, and could well look like this:

image

BPEL of course offers correlation – the mechanism that allows us to feed messages into already running BPEL process instances. However, before SOA Suite 11g PS5, an inbound operation in a BPEL process – Receive, OnMessage – either initiates an instance (and possibly a correlation set) or it can correlate the inbound message into a running instance. But it cannot do both. So for the customer requirement at hand, correlation as it was is not good enough. See this article for the problems we ran into before the PS5 release: http://technology.amis.nl/2011/02/24/batch-aggregation-of-files-in-bpel-process-instances-based-on-correlation/.

The File Adapter processing the file with invoice entries is not aware of any BPEL process instances that may already be running. So it will simply try to invoke some operation – something like processInvoiceEntry – on a BPEL process. This operation will be configured to receive into a running instances based on correlation on the customer identifier or it will receive and start a new instance. If there is not already a running instance for the specific customer, no correlation can take place and the first implementation of the operation would fail (to correlate). However, a call to the second implementation will fail after the first call to process an invoice entry for a  customer because a correlation set for the customer can be created only once. Note that a failure to correlate is not evident very rapidly, as is clear from a mail on this topic that I sent in March 2011 to the SOA Suite product development team:

“[…]  We only find out that our message did not correlate into a running instance because of the time out that occurs on the synchronous reply. In order to have a fast answer to the question whether or not an instance is running – we currently always assume that an instance does not already exist, catching the ConflictingReceive fault as an indication that an instance does exist, then correlating into that one. Apart from the fact that far too much knowledge about the CompanyInvoiceAggregator composite is now assumed in the InvoiceProcessor , it is also quite horrible for the administrator to see a faulted instanced as a result of this workaround. It would be very convenient if we could very rapidly find out – on the first call for a company [id] from InvoiceProcessor to CompanyInvoiceAggregator that there is not yet a running instance (preferably without even a fault) – rather than waiting for 45 secs (or whathever systemwide value we set). Even being able to specify a sub-second time out on a specific synchronous Invoke activity would be useful.”

The short term response from the team helped us to understand our situation and find some workaround. The longer term reply was a new feature in the BPEL engine, introduced in PS5, that allows us to configure a Receive operation to have the conditional correlation behavior we were looking for:

  • if the consumer invokes the BPEL process via the operation using a correlation identifier (in this case the customer) for which there is not a running instance, then a new instance is initiated
  • if the operation is invoked with a correlation identifier matching an existing running instance, then correlation takes place into that instance

This means that our customer-by-customer aggregation can now be implemented: the first invoice entry for a customer will cause a BPEL instance to be initiated for that customer and every subsequent call to the same operation by the file adapter will result in correlation into that instance.

This article demonstrates the steps required to implement a BPEL process that makes use of this new correlation facility.

BPEL Process to process InvoiceEntries

The SOA Composite to demonstrate the functionality in its simplest form is nothing special at all just a BPEL process with an exposed SOAP Web Service (with a single operation processInvoiceLine):

image

The WSDL for this process is trivial:

image

a single, one-way operation with a request message with one part. This part is described in the XSD document:

image

Still nothing special. Now comes the BPEL process. The BPEL process that we can create to process invoice entries is relatively simple. And only a few steps in the development process are specific for the aggregation pattern.

It kicks off with a Receive activity. This activity is associated with the single operation in the WSDL definition. It is configured to initiate the BPEL process instance and to instantiate a correlation set:

image

The correlation settings for the Receive activity – note that a Correlation Set called CustomerCorrelationSet is initiated by the Receive activity:

image

The CustomerCorrelationSet is defined with a single property called CustomerIdentifier of type String:

image

We need one additional link the correlation set up: the mapping between the request message sent to the operation processInvoiceLine and the property CustomerIdentification in the correlation set. When you take a look at the XSD that describes this request message, it is not hard to come up with this mapping:

image

the element customerIdentifier in the request message contains the value used to identify the BPEL process instance – through the correlation set which is really nothing more than the Unique Key for the BPEL process [instances].


The functionality in the BPEL process for now will be limited: count all invoice lines for the customer and sum the amounts in all lines to a grand total. Two variables are created in the BPEL process to hold these values:

image

These variables are called LineCount and TotalInvoiceAmount.

When the first invoice line message is received for a customer – and a new instance of the process is initiated – these variables are also initialized, in the first Assign activity in the BPEL process:

image

Note how LineCount is set to 1 and the TotalInvoiceAmount variable is set to the amount in the first invoice line being processed (copied from the inputVariable that holds this first invoice line).

You also see a new variable called continueProcessing. This is a flag that indicates whether the process should wait for additional invoice line messages for the customer for which the current BPEL instance is created. This flag is referred to in the While loop that waits for more messages to arrive into the instance.

The question is of course how the process knows if there are more invoice lines to be processed. The entries in the file could contain a ‘last message’ indicator – that would be one strategy. Or each message could indicate the total number of lines for the customer. Or we could make use of a timer in the process that interprets a wait of X seconds after the last message has been processed as an indication that no more messages are to be processed for the customer. The exact situation is outside the scope of this article – let’s go for the timer based approach. Which does not necessarily need the flag variable by the way…

Below is the relevant section in the BPEL process. The While loop that is initiated after initializing the variables based on the initial message – and that will keep running for as long as the variable continueProcess has the the value Y (the value it has been assigned in the initialization step). Inside the While loop you see the Receive activity ProcessNextInvoiceLine. This activity is configured exactly the same as the initial Receive activity, but for two important differences: this mid-process receive activity has the checkbox Create Instance unchecked and it will not Initiate the correlation set.

image

This receive activity will consume messages that were also sent to the processInvoiceLine operation – but with a value for the customer identifier that has already been used for creating a running BPEL instance.

The essence of the new functionality is right here: two Receive activities associated with the same operation – one that will instantiate the instance and the correlation set and the other one that will correlate into a running instance. The engine will decide for itself if it has to do one or the other.

Note: in order for this behavior to work, we need to set a (deployment) property on the BPEL component – in the composite.xml file.

image

The name of this property is bpel.config.reenableAggregationOnComplete. Its default value is false; in order to make the BPEL engine display the behavior described here, we need to set the property to true. Note: the document (see list of resources at the end of this article) describes in detail what situations you may encounter with this setting; it also makes it clear that this behavior is the exception.

The further processing required in the BPEL process is a way to conclude the instance when we determine that no more messages are forthcoming for the customer. The somewhat roundabout approach I have adopted here goes as follows:

the Scope inside the While loop has an onAlarm event handler that is triggered after 1 minute; that means that if no message has been received in this instance within 60 seconds after processing the previous message, the event is triggered. The handler will throw a fault that causes the while-loop to be aborted. The scope that contains the While loop has a Fault Handler that catches the fault thrown when the alarm is triggered and does nothing. This means that normal processing of the process beyond this scope can resume. This processing could consist of taking the aggregated data and producing an invoice. At the moment – there is no further processing as it is not required to make the point of this article.

image

The detailed configuration for the Throw and Catch activities is shown here:

image

The final activity in the BPEL process is the processing of the Invoice Line. In this case, the processing is nothing more than adding one to the LineCount and adding the incoming invoiceAmount to the TotalInvoiceAmount variable.

image


Running and testing the BPEL process

The SOA Composite that has now been created can easily be tested – even without the file adapter. By invoking the service and operation exposed by the SOA Composite with the following values for CustomerIdentifier and Amount we can see the effect of the aggregation support:

image

After deploying the SOA Composite application, we can test the service from the EM FMW Console:

image


Here the message flow trace and the audit trail/flow for Customer D:

image

After the initial instance creation, two additional invoice line messages are received and processed in that instance. The audit trail for the BPEL process instance looks like this and ends with an interrupted scope (mid-While Loop).

image

The aggregate over all invoice lines for Customer D is 3700 – as determined by the BPEL process.

The audit flow for the interruption:

image

This test-run demonstrated that the BPEL engine is capable of aggregating multiple messages into the same BPEL process instance – using the same operation for both the initial receive and the mid process receive.

Simplify process using Pick

The process as is – with the OnMessage Handler, the Throw Fault Activity and the Catch Fault handler – is overly complex. Cannot the same functionality be implemented using a Pick activity: either wait for one minute or receive a message into a running instance? The documentation does not mention the onMessage branch of the Pick activity as being capable of this same feat. So let’s just try the following process and see if it works too.

Here the Pick has an OnMessage branch that is configured similar to the mid process Receive in the previous process definition and an OnAlarm that is configured just like the OnAlarm Scope Event Handler we previously used.

The good news is: this behaves exactly the same as the previous process definition. In other words: the capability to aggregate multiple messages into the same running instance applies also to Pick + On Message and not just to Receive. Here is the audit trail from testing the revised and simplified process:

Resources

Download the JDeveloper application with the SOA Composite containing the BPEL process: AggregationOfInvoiceLines.zip.

SOA Suite 11g Developer Guide -  Using Correlation Sets and Message Aggregation  http://docs.oracle.com/cd/E23943_01/dev.1111/e10224/bp_correlate.htm#CHDEIGCG

Fanning Out Events on the Oracle SOA Suite 11g Event Delivery Network

$
0
0

On the Oracle Technology Network, architecture section, my article titled “Fanning Out Events on the Oracle SOA Suite 11g Event Delivery Network” has just gone live:

image

This article describes:

how events can be used in Oracle SOA Suite 11g to have business processes impact each other in a meaningful way with maximum decoupling. Specifically, this article describes a solution for fanning out Event Delivery Network (EDN) events to a more fine-grained level. This allows a single event to influence multiple running instances of a Business Process Execution Language (BPEL) process. The article uses the following Oracle SOA Suite 11g components: BPEL , Mediator ,Event Delivery Network, Spring , Locator API , Composite Sensors

Creating an hierarchical user structure in embedded LDAP of weblogic

$
0
0

Introduction

Users and groups are essential for the assignment of tasks in BPM and/or BPEL. On a production environment a seperate LDAP server is used, with it’s own administration tools. On a development enviromnent however, the embedded ldap in weblogic is used very often, giving you the flexibility to create your own users and groups. Administration of the embedded ldap is done trough the weblogic console.

However the creation of a hierarchy between users is not possible using the console for the embedded ldap. The manager property neccesary to create the hierarchy is unfortunately unavailable.

User hierarchy is very usable in task assignment from BPM and/or BPEL so how to assign managers? In this blog I will describe how to create this hierarchy using an external ldap browser.

How to

The first step is to configure the embedded ldap. The credentials for weblogic must be specified so you can access is using an external ldap browser.

  • Open the weblogic console
  • Click on your domain
  • In the domain settings window, click Security, then on Embedded LDAP
  • Set the credentials
  • Save
  • Then restart the weblogic server

Download and install an LDAP browser, I used JXplorer.
Create a connection to ldap running on weblogic server.

  • Hostname: your_host_name
  • Port: port of admin server
  • Protocol: LDAP v2
  • DSML Service: empty
  • Base DN: DC=your_domain_name
  • Security level: User + Password
  • User DN: CN=Admin, don’t use weblogic
  • Password: credentials set in weblogic console
  • “OK”
  • You will see a navigator showing your groups and users

Using this browser it is possible to administrate users and or groups. Our goal was to create user hierarchy like for example a manager – employee relation. Let’s assume we have the users, king (the boss), john and josh (the managers) and Andrew and Adrian as employees. The following hierarchy must be created.

King
-John
–Andrew
-Josh
–Adrian

This should be done by specifying each users manager.
In JXplorer select the user John, on the other tab in the html view specify his manager. Here you should use the whole ldap path to the user id of the manager.

The syntax of this path is: uid=uid_of_the_manager,ou=people,ou=myrealm,dc=your_domain_name
Using the values for king results in the property value for the manger of john and josh.
This hierarchy can be visualized using jdeveloper using the identity lookup, on for example the assignment tab of a task definition. Search for john and click on hierarchy, king is shown as manager.

Next select john and click on reportees, andrew is shown as reportee.

Repeat this for josh. As you can see the whole hierarchy is created and ready to be used in task assignment.

Resources

I used the preconfigured virtual box provided by Oracle

(2/2) Using the MetaData Services (MDS) in a SOA environment

$
0
0

It has been almost a year since my last post about the metadata services. I talked about how-to set up a File-based MDS and DB-based MDS. This post talks about the usage of the files, placed in the MDS, in the different components available in a SOA composite. If the MDS is a new thing for you then I advise to read my previous about this subject first.

You can spot the presence of a file that is a reference to the MDS if it uses the oramds: URI annotation. Files are no longer referenced to a hardcoded or relative file path.

To start using you’re MDS that you have set up we will create a new SOA application. Let call the application WorkflowSOAapp and create a SOA project and call it WebformService.

Create a new SOA Application

Create a new SOA Application

Create a new SOA Project

Create a new SOA Project

Create an empty composite

Create a empty composite

In the last step of configuration select the Empty Composite template. I always prefer to start with a clean composite.

Use MDS resources for exposed services

After creating the new SOA project it will open the composite editor automatically. Exposed services are always created in the left swim lane. Because this project deals with a WSDL resource to expose a webservice, a Web Service component is first dragged to the left swim lane.

Create exposed service

Drag Web Service Component to left swimlane

A dialog “Create Web Service” will open. Give the service a good name, preferred the same as the name in the WSDL (e.g. WebFormService). The next thing to do is to choose the WSDL URL. Click on the document jdev_document_icon icon at the right side of the WSDL URL input to find an existing WSDL.

select a existing WSDL

Select a existing WSDL to use for exposed service

A second dialog “SOA Resource Browser” opens, click on the dropdown list at the top and select Resource Palette instead of File System. The interface of the dialog will change to represent the same view as in our main window of JDeveloper. Expand the tree multiple times and drill down to your local MDS connection.

Expand the tree futher and open up WebFormEOL -> WSDL and select webformService.wsdl.

select WSDL from MDS

Select WSDL from MDS via resource palette

The second WSDL is a implementation WSDL which is used when the webservice is called as a external service and contains binding and service information. Which we don’t need when we create our own service, because deployment will create a implementation WSDL.

Click OK to choose this WSDL file and you will be back at the “Create Web Service” dialog. Take a look at the start of your new WSDL URL input, it’s now starts with oramds: protocol. Click OK to create the service component.

WSDL url using oramds protocol

WSDL url using oramds protocol

Note: DON’T check the box in front of the copy wsdl option. We use the MDS so we don’t need a local version in our project.

Use MDS resources in a Mediator

Drag a Mediator component to the components area of the composite.xml and create a new mediator and select to define the service later. Give it a good name (e.g. WebformMediator). Then drag a wire from the web service component in the left lane to the mediator to connect them.

wire mediator to exposed service

Create mediator component and wire it to the exposed service

Double-click on the mediator component to open the CustomerMediator.mplan, the editor for modifying a mediator, and notice that the WSDL URL references to the one in the MDS we selected when creating the web service adapter.

mediator uses WSDL from MDS

Mediator uses WSDL referenced from the MDS

Also all the operations are added under the Routing Rules, but that is not different then selecting it as a local reference.

Use MDS resources in a BPEL Process

Drag a BPEL Process component to the components area of the composite.xml and create a new BPEL process. In the “Create BPEL Process” dialog choose the BPEL 2.0 specification if it’s available (11gR1 PS3+). I’m using the 2.0 spec, because it uses the reference specification at default, without any oracle extensions and thus easily ported to JBPM or Apache ODE.

bpel uses WSDL from MDS

BPEL uses WSDL referenced from the MDS

Give the BPEL process a good name, I usually give it the name of the operation in CamelCase. For this example I’m going to make a BPEL process that implements the RegisterForm operation, so I will give it the same name. For this example you can leave the namespace at the default value, but in real-life I usually incorporate the company name and project name in the namespace. Choose for the template option “Base on a WSDL”, set the value for service name and give it a similar name as the WSDL. Important is that we don’t expose it as a SOAP service. Just like with the Web Service adapter select the WSDL from the local MDS connection in the resource palette. It should look something like this:

create bpel process using mds resource

Create a BPEL process with a WSLD referenced from the MDS

Besides the creation of the .bpel and .componentType file, there is a new WSDL wrapper file. BPEL creates this, because BPEL uses partnerlinks and a wsdl file at default doesn’t have one. The best practices is not to add a partnerlink to the original WSDL file. Most of the time you will reference an external WSDL which will not contain a partnerlink and wrapper files are then automatically created. A wrapper file is not placed in the MDS, because it is a project resource and not reused very much. Another reason is that a BPEL component doesn’t handle wrapper WSDLs very well if they are referenced from a MDS.

wrapper WSDL with partnerlink

A wrapper WSDL is created which contains the partnerlink

Wire the mediator with the BPEL process. If a WSDL has multiple operations a dialog “Choose Operation” is shown.
For this example link the same operation name RegisterForm.

wire mediator to bpel component

Wire the Mediator to the BPEL component for decoupling operations

Incorporate Domain Value Map as a MDS resource

A Domain Value Map or DVM is like a simple database table used for lookup lists or single entities. A DVM can be used to store for example a list of companies, formtypes or error messages. There can be a relationship between the data in various DVMs, but they stand on their own and have no knowledge of each other.

A DVM can be used in various levels of a SOA composite. A DVM can be used/accessed in a BPEL component or in a XSLT transformation file. In BPEL there is a XPATH function which can be used directly in the assign activity or when using the DVM in a XSLT it can be used in the transformation activity. The XSLT transformation file can also be used in a Mediator.

I have made a little scenario for this. The XSD types that the BPEL process is using have a few message details which one of these is a casetype. The use of a casetype is not allowed for every user that calls the service. So the first thing the process checks is if the requesting user is allowed to send a message revolving the given casetype. The DVM has three domain columns; company, casetype and allowed which has a true/false value.

Using the DVM, referenced from the MDS, in BPEL

First we are going to look at the direct usage in the assign activity. Open up the BPEL process that was just created, via the project browser, and drag a assign activity from the right and place it between the receiveInput and replyOutput activities. Don’t forget to give the assign activity a name that suits the lookup check (e.g. lookUpCasetypeIsAllowed).

bpel process with dvm lookup

BPEL process with assign for DVM lookup

The value from the DVM needs to be saved in a variable, so before accessing the DVM we need to create a local variable. Click on the variables button of the main scope and create a variable for the result of the lookup. For this case it would be of type xsd:boolean.
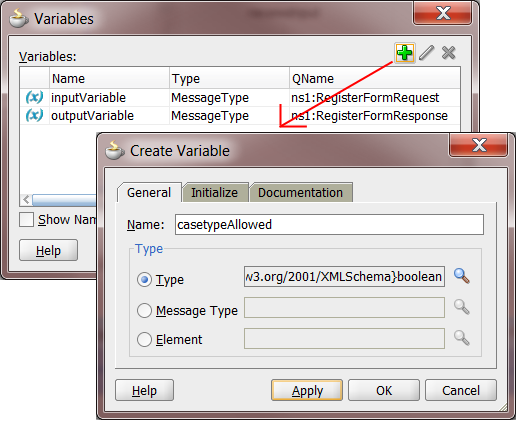
create a local variable

Create a local variable for the lookup result

Also two more variables of type xsd:string, which will contain the company name and actual casetype from the input, and give them appropriate names (e.g. company & casetype). The XPATH function we’re going to use works more reliable if the input element is a string.

Double-click on the assign activity to edit the assign and add copy rules. To access a DVM there are XPATH functions that can be used.
• The first rule maps $inputVariable.payload/ns3:intakeDetails/ns3:casetype to the local variable $casetype.
• The second rule maps $inputVariable.payload/ns3:messageDetails/ns3:sender/ns3:organisation to the local variable $company.
• For the third rule we’re dragging the expression JDev_expression_builder_icon icon onto the output variable which will contain the result of the DVM lookup (e.g. Drag_icon_on_local_variable).

After dragging the expression icon on the output variable a window “Expression Builder” is opened. Under functions select DVM Functions in the dropdown list and you will see to lookup functions listed. For this example I’m (only) using the lookupValue function. Click on the function name and click on the Insert Into Expression button.

You will notice that only the expression being build is any empty function of dvm:lookupValue() but what are the parameters when we are using a DVM which is referenced from the MDS? For this to answer we need to know how the lookup works and how a ORAMDS: URI looks like.

First we look at the usage format of the lookupValue() function:

dvm:lookupValue(dvmLocation as string, sourceColumnName as string, sourceValue as string, targetColumnName as string, defaultValue as string, (qualifierColumnName as String, qualifierValue as string)*))

The one field interested here is the dvmLocation which needs to be a reference to the MDS. MDS resources are accessed by the ORAMDS:/ protocol and after that the location of the file. The root of the MDS is the seed which is configured in adf-config.xml. In our case the used DVM (e.g. AllowedCompanyCasetypes) is located in the apps/WebFormEOL/DVM/ folder. But also we need to use an extra qualifier column, because we have two input fields to check.

The final expression will select the value of column allowed and uses the company and casetype column to find a match:

dvm:lookupValue("oramds:/apps/WebFormEOL/DVM/AllowedCompanyCasetypes.dvm", "company", $company, "allowed", "false", "casetype", $casetype)

Because we use a boolean we need to wrap the dvm:lookupValue function into a boolean expressions by comparing the output to the string “true”.

boolean(dvm:lookupValue("oramds:/apps/WebFormEOL/DVM/AllowedCompanyCasetypes.dvm", "company", $company, "allowed", "false", "casetype", $casetype) = "true")

At this point we have the copy rules setup:

dvm lookup copy rules

Three copy rules, two for initating local variables and a dvm lookup.

After the DVM lookup we can create a validation step to check if the condition is true, else we can throw an error.

validate dvm lookup result

Validation step in BPEL that checks lookup result if casetype is allowed

Using the DVM, referenced from the MDS, in a XSLT

Sometimes a domain variable can have a different meaning in the destination system then in the source system, because of a different business jargon. A DVM can then be used to transform the domain value from one to another type. The XSLT can then be used in the transformation activity within a BPEL process or use the XSLT in the Mediator.

Setting up a DVM lookup in a XSLT transformation file is much easier, because of the simplified UI. First drag the transformation activity into the BPEL process and double-click on the new activity. For a simple transformation, create one between the input and output variable. When creating a new transformation file the editor will automatically open.

Same as in BPEL you can use the DVM functions to access the data in a DVM. In the Component Palette, usually at the right, select the Advanced Functions from the dropdown list and expand the DVM Functions tab. Here you will find the same function, lookupValue, as used in BPEL.

dvm function in xslt

DVM functions can be used in XSLT

Drag this function to the middle part of the transformation editor and double-click on the JDEV_DVM_icon icon that appears. The Edit Function dialog opens where you can select the dvmLocation by looking it up via the resource palette showed earlier in this article.

lookupvalue ui dialog

LookupValue UI dialog in XSLT editor

In this dialog you also select all the fields that make up the lookupValue function like the sourceColumnName, sourceValue and targetColumnName. The first and latter one can be looked up via the search JDev_lookup_icon icon. And if you need qualifier columns just click on the ADD button.

This concludes this article. As you see there are a lot of places the MDS resources can be used like in a Mediator, BPEL or transformations. If you have changes to one the these type of files, you don’t want to change it in every component it uses, but just on one place and that is why we use the MDS.

p.s. one resource that I did not preview here is the EDN event configuration file, but this works also with the resource palette and is self-explanatory if you have read this article.

References

1 Download the sources here, including deploy scripts.


Processing large files through SOA Suite using Synchronous File Read

$
0
0

Introduction

Reading files using SOA Suite is very easy as the file-adapter is a powerfull adapter. However, processing of large files is less trivial. You don’t want to read the huge file into memory and then process it. Preferable you process it in smaller chunks. Chunking the file using the “Read File” option of the file-adapter is pretty staight forward, all you need todo is to specify the publish size. Working with chucks for the “Synchronous Read File” option used from BPEL is less easy. In this blog I’ll describe how to implemement processing of a large file using BPEL and the “Synchronous Read File” option from the file adapter.

Description

In this blog we will create a compostite which will process a “large” file, in this case not really big but big enough to demostrate all the essential steps. A file adapter should start the BPELprocess, this process must read this file in chunks. For each chunk an action must be performed, after all the chunks are processed, the BPEL proces is done. We use the Read option from the file adapter to start the BPEL process, but this Read operation should not read the content. We configure a second, Synchronous Read File, adapter to read the content of the file in chunks. Each chunks is then processed individually.

Preparation

Download sca_ChunkedRead_rev1.0, unzip and import this sca into your application. This SCA contains the xsd’s and the datafiles used in this blog.

Implemention the SOA Composite

First step is to create the File adapter to trigger the compostite to start working.

    1. Open the imported ChunkedRead composite
    2. Add a File adapter to the “exposed services” swimlane, name it “PickupFile”, Next
    3. Interface “Define from operation and schema”, Next
    4. Operation type “Read” and select “Do not use file content”, Next

    1. Select directory name = Logical Name. Name it FILE_IN, Next. Make sure not to select the delete file option

  1. Include files with name “articles.csv”, Next
  2. Next, Next, Finish

The next service to create is the file adapter, which reads the file that triggered “PickupFile” in chunks.

    1. Add a File adapter to the “external references” swimlane, name it “SynchChunkedFileRead”, Next
    2. Interface “Define from operation and schema”, Next
    3. Operation type “Synchronous File Read”, Next
    4. Select directory name = Logical Name. Name it FILE_IN, Next.

    1. Include files with name “overwriteme.txt”, Next.  the name wil be provided by the BPEL process, Next
    2. Click on the magnifying glass, browse to the articles.xsd in the xsd folder in the project, select Articles as Root element, Next

  1. Finish

So far  we just created a file adapter doing a synchronous read, now let’s modify it so it will read the file in chunks. This is done by modifying the SynchChunkedFileRead_file.jca file. You’ll find this file in the project explorer. Open this file. Change the classname for the  interaction-spec to “oracle.tip.adapter.file.outbound.ChunkedInteractionSpec”. Also add a property to specify the chunksize, for now we use 55  “<property name=”ChunkSize” value=”55″/>”. The file should look like this.

Save and close this file. Next we must create a BPEL process to actually read the file and process each chunk.

    1. Add a BPEL process to the “components” swimlane
    2. In the wizard, change to BPEL 2.0 specification, name it “ChunkedFileReadProcess”, template “Define Service Later” and press OK

    1. Go back to the composite.xml and wire the “PickupFile” to “ChunkedFileReadProcess” by dragging the arrow to the process, and from “ChunkedFileReadProcess” to “SynchChunkedFileRead”. Your composite should look like this.

    1. Open the BPEL process
    2. Create the following list of variables, we will use these to store the property values for the file adapter
      • dir, type is string – store the filename to process
      • file, type is string - store the directory where the file resides
      • isEOF, type is string - specifies if the EndOfFile is reached
      • lineNumber, type is string – specifies the linenumber to start reading from
      • columnNumber, type is string
      • noDataFound, type is string
    3. The BPEL process should start when the  file specified in “PickupFile” is picked up by the adapter, add a recieve activty to the process and open the properties. Name it “ReceivePickupFile”, select “PickupFile” as partnerlink. Tick “Create Instance” and autocreate the inputvariable.

    1. Goto the properties tab, add two properties to get the jca.file.FileName and jca.file.Directory from the adapter. Store these values in the corresponding variables.

    1. Click OK
    2. We want to process chunk by chunk we should create a loop. Drag a “While Activity” below the recieve. For the condition use “$isEOF = ‘false’ “, as long as you didn’t get to the “EndOfFile” we keep reading.
    3. Inside the loop drag an “Invoke Activity”, open the properties and select “SynchChunkedFileRead” as partnerlink. Name the activity “InvokeSynchChunkedFileRead”. Auto create the input and output variable using the + sign.

    1. Goto the properties tab, add “To properties”,  to pass the jca.file.FileName and jca.file.Directory from the variables to the adapter.
    2. Next add “From properties”, to het the filename from the adapter. This is just a trick to create the correct propertie structure wich we will chanch in the next step.  Click OK.
    3. Open the source tab from the bpel process and find the invoke activity. Copy and past the two just created “To properties” for the filename and directory. Change the copies sources to “jca.file.LineNumber” and “jca.file.ColumnNumber” fill these from the corresponding variables.

    1. Do the same form the “From properties”. Match the  following picture.

    1. What we did was to specify which chunck to read, from line  and column to a line and column, the other properties specify End Of File reached, is Data Found. These will be used in the next loop and to determine if there is data to process.
    2. Go back to the Design mode.
    3. Next we should initialize the variables. Add an “Assign Activity” before the loop, assign ‘false’ to variable ‘isEOF’, ’1′ to ‘lineNumber’ and ‘columnNumber’.
    4. We now did all the work to read the file chunk by chunk, next step is to process the data returned when data is found.
    5. Add an “If Activity” inside the loop, below the “Invoke”, name  the IF “DataFound” and set the condition to $noDataFound = ‘false’. When the adapter returns false, there is data to process.
    6. Inside the if branch you process the data. Now we just add an empty activity with name “ProcessData”, inside the else branch add  an empty activity with name “NoData”. This to show the difference in the audit trail. You BPEL should now look like this:

  1. Next, create a configplan to provide correct values for the logical file locations. Right click on the composite, generate config plan. Open the plan and provide correct data for FILE_IN for “PickupFile” and SynchChunkedFileRead.
  2. Deploy you composite to the server using the config plan.

Run Composite

Now it’s time to see chunking into action. Make sure your audit level is “Development”. In the downloaded sources in the files folder you’ll find a file called articles.csv. This file containt 300 rows, the chunksize is set to 55, we need 300/55 = 6 file read to read the whole file. Place this file on your server in the location specified in the config plan. After the polling interval, you’ll see an instance for the ChunkedRead compostite. View this instance. you’ll see that the SynchChunkedFileRead is invoked 6 times.

Click on the bpel process instance, look at the invokation of the SynchChunkedFileRead  in the first loop. You’ll see all the properties being exchanged. As expected, IsEOF is false, and we’ve read until line 56. Scroll down to the bottom and look at the invokation of the SynchChunkedFileRead  in the last loop. As expected, IsEOF is true, and we’ve read until line 301.

Reading complete, the loop is exited and the process completed.

You’ll notice the file is not deleted. You should implement this outside of the loop.

If the file isn’t picked up, open a putty session to your server. Goto the directory /fmwhome/user_projects/domains/dev_bpm/fileftp/controlFiles, remove the ChunkedRead folder and the file will be picked up again.

In an other article I will describe how to unzip the file to read, using pipeline valves.

Used versions

  • SOA Suite 11.1.1.6
  • BPEL 2.0


The post Processing large files through SOA Suite using Synchronous File Read appeared first on AMIS Technology Blog.

SOA Suite 12c: First look at SCA Composite features

$
0
0

Oracle released SOA Suite 12c (12.1.3) bringing a further integration between components and a bunch of new features. This blog is one in a series of new features summaries about SOA Suite 12c to view them all check this blog.

This blog will summaries the features specific to SCA Composites / BPEL and the Enterprise Manager Dashboards. The features are summarised, but most will get an own blog that tells about the full details.

This blog will talk about the following topics:
• Changed project / directory structure • Project / Component en Scope Templates • Updates to the composite editor • Updates to the mediator • Updates to the BPEL component / activities • Fault Policy Editor • SOA Composer refresh in 12c • SOA Suite Debugger •

Disclamer: Screenshots are made in Beta version of SOA Suite 12c, so may differ in final version!

Changed project / directory structure

The structure of the project has changes drastically. All components are now placed in there own sub folder.

12c Composite: Project Structure • Adapters – Collection of JCA adapter resources

• BPEL - Collection of BPEL en SBPEL components

• DVM - Collection of Domain Value Maps

• Mediators - Collection of Mediator components

• Schemas - Collection of XML Schemas (XSD)

• Testsuites - Collection of Composite tests

• Transformations - Collection of XSLT transformations

• WSDLS - Collection of service contracts

The composite.xml carries the same name as in 11.1.1.7, the name of the SOA project.

Kick-start an SCA Composite using templates

In 12c it is easier then ever to re-use at all levels within a SCA composite. Using the build-in template support you can kick-start a SCA Composite or add reusable components. There are three types of templates; SOA Project, Component and Custom Activity template. Templates are fully editable, one you apply them to you SCA Composite or BPEL component it is part of that composite or component. When you create a template all dependencies (partnerlinks) are also part of the template.

SOA Suite SCA Templates

Templates in SCA Composite

Project Templates
With this kind of template you can create/load an entire project. Great example for this template is a skeleton project with default adapters and mediators (without wires) of use it for training purposes so that everybody starts with the same resources. Project templates are accessible at the time of new project creation directly, or when it is part of new application.

Component Templates
With this kind of template you can create/load a component with all his dependencies (resources and components). For example a BPEL process with default invocations to common services. This template can be automatically discovered in the component palette when in the Composite editor.

Custom Activity Templates
Similar to a standalone subprocess, only the code is added to existing BPEL process and dependencies are added to Composite. It can contain variables and activities (assign, invoke, transformation, etc). This template can be automatically discovered in the component palette when in the BPEL Component editor.

12c Composite: Consume Templates

12c Composite: Consume Templates

Templates will be visible if they’re available in the template path, configured in JDev, but there is also an import wizard available to bring templates in from different system.

Re-use of BPEL code using Sub-processes

Sometimes in BPEL you will do the same thing on multiple places within the same BPEL process. For futher re-use of code this release of SOA Suite 12c introduces BPEL Sub-processes. Sub-processes allow certain business logic to be made reusable.  There are two types; standalone and inline. Inline Sub-processes permits access to data (variables) of the parent process, but with a standalone Sub-process the data needs to be assigned. Sub-processes are here to improve performance (faster rendering of only entity in question) and manageability (modular approach) of BPEL processes.

12c Composite: BPEL Standalone Sub-Process

12c Composite: BPEL Standalone Sub-Process

Details about inline sub-process:

  • Group activities that can be re-used in the same BPEL process
  • It is part of the parent BPEL process code and not visible in composite view.
  • There is a new call’ activity in BPEL to call a sub-process
  • You can define parameters or use the parent process parameters.
  • The inline sub-process is visible in the BPEL palette.
  • Activities should be part of a scope to be converted to a sub-process.
  • At run-time, the code of the sub-process is reusable and can be parallel used.
    Only one copy is stored in the memory, even when it is invoked 20 times.

Details about standalone sub-process:

  • It is a fragment of a BPEL process, which includes a set of activities that can be reused by other BPEL processes.
  • A standalone sub-process has no interface, and can only be called by another BPEL process, but may have partnerlinks.
  • In the composite view, the wire to a sub-process is shown as a dotted line, in order to indicate that there is no interface.
  • The ‘call’ activity is used to call standalone sub-processes.
  • In the first release of 12c, sub-process can not be called from outside its own Composite, but it may change in the future.
  • Sub-processes are visible in the component palette to make them easy to drag into a BPEL process.
12c Composite: BPEL Call Activity

12c Composite: BPEL Call Activity

Share artifacts within and across applications

In 12c it is now more then ever easy to use the MDS. It is now possible to transfer (local) artifacts from a SOA application to the Design-Time MDS. JDeveloper has a wizard to share design time artifacts such as WSDLs and Schemas across applications. After transfering the artifact the references are automaticly updated with MDS URL.

JDeveloper 12c: Transfer artifacts to MDS

JDeveloper 12c: Transfer artifacts to MDS

Updated XSLT mapper and new XQuery support (including own mapper)

The choice for the developer is going to be tough, use XSLT of XQuery. In this release Oracle 100% XQuery 1.0 support with it’s own mapper, but also updated the XSLT mapper with some high requested features. BPEL even has a dedicated activity to use XQuery in your BPEL code for transformations.  The XQuery mapper has support for XPath 2.0 and user defined functions. The mapper is really user friendly and it’s made consistent with the XSLT mapper interface. The mapper also has an integrated Test framework and is build for reuse in both SOA & Service Bus. The update XSLT mapper now has a better support for complex stylesheets with multiple templates, user defined functions (also recursive functions) and you can see the XSLT execution sequence.

12c XQuery Mapper

XQuery Mapper in JDeveloper

XSLT Mapper in JDeveloper

XSLT Mapper in JDeveloper

New design of Component and Properties palette

In JDeveloper 12c the Component and Property palette undergone a metamorphosis. In the Component palette the Components and adapters are now logically separated and it is possible to display the items in a list view.

JDeveloper 12c: Component Palette

JDeveloper 12c: Component Palette

In 12c the Properties palette is finally used when developing SCA Composites and Service Bus Pipelines. It displays as it were, all the steps in the wizard or tabs of the dialog window of a component activity. Instead of editing the activity using the wizard you can now use the Properties palette to make changes.

JDeveloper 12c: Properties Palette

JDeveloper 12c: Properties Palette

Updated Mediator Component

The mediator has some new features in 12c. The overall editor looks similar and current 11g function are still present, but some nifty features are added in this release.

Translate from Native action

At the level of the Java callout an extra action Translate from Native is added. With this action you can transfrom a CSV/JSON/String element of the request to XML using a NXSD transformation. The transformed output can then be used in the routing rules of the Mediator. This action can be done on operation level, but also on a specific routing rule for that operation.

Override Using action

With this action you can override routing rule options using a DVM or Business Rules. Based on a element value of the request you can change the routing rule option dynamically. With the key value you have the possibility to override the XSLT transformation file,  Filter expression, Execution Type, Syntax Validation (XSD), Semantic Validation (Schematron) file instead of creating a bunch of static routing rule.

Mediator 12c: Override Using

Mediator 12c: Override Using

New graphical editor for Assign action

The last noticeable change to the Mediator is that the graphical editor for the Assign action is the same as BPEL uses.  You can create multiple copy rules by using drag and drop functionality.

Mediator 12c: Assign Values

Mediator 12c: Assign Values

Sensors DT@RT

Sensors are already a known feature of the SOA Suite 11g. It’s basically means marking a variable or data field to be traced at runtime. So at runtime you can see the values of this field or variable for a running instance, but also you can search for running instances (e.g. find the running instance of which the field ‘order id’ has value ‘AB12345’). In SOA Suite 11g these sensors had to be defined at design time. In the SOA Suite 12c it also will be possible the define or change them at runtime: Design Time at Run Time (DT@RT). This functionality is added to the existing ‘SOA Composer’ application, which is already used to change other runtime metrics like the Rule Engine and Domain Values Maps (DVMs).

SOA Composer 12c: Sensor Values

SOA Composer 12c: Sensor Values

JDeveloper 12c: Configured Sensor(s)

JDeveloper 12c: When hovering on service binding an overlay with sensors is shown

Fault Policy Editor

One feature that surprised me when I was dissecting the Beta version of 12c was the addition of the Fault Policy editor. In 11g Fault Policies were added so that you could easy intervene when a (SOAP/BPEL) fault was thrown. But you could only create them in source mode, there was no graphical editor. In 12c Oracle has added this long awaited request. With the Fault Policy Editor you can now Design and Edit Fault Policies. Besides the already existed functionality a lot of new features are added.

  • Graphical editor for creating Fault policies, Alerts, Actions & Property Sets
  • New Default actions for invoking a WS and enqueue data (JMS).
  • Alerts can be defined to send fault to JMS, Email or Log file.
  • Alerts can be assigned to actions if type of Alert is desired to be triggered.
  • Fault Policies can be coupled, using the Composite Binding dialog, to different levels:
    • composite • component • reference binding and service binding •
12c Composite: Fault Policy Editor

12c Composite: Fault Policy Editor

Encrypt/Decrypt Personal info

Another new feature in 12c JDeveloper is the – Encrypt/Decrypt Personally-Identifiable Information or (PII). It assists in Protecting sensitive data from appearing in the Admin consoles in clear text.  For example a Social Security Number or Credit card Number. Specific Fields in a message can be encrypted when entering the SOA composite application in the service binding component, and decrypted while exiting the application in the reference binding component. It is available for services and adapters in both SOA (SCA Composite) and Service Bus. The PII policy is attached to the SCA Composite. The credentials/encryption to use is configured on WLS and is stored using the Credential Store framework (CSF).

12c Composite: Encrypt/Decrypt Sensitive Data

12c Composite: Encrypt/Decrypt Sensitive Data

Enterprise Manager

The Enterprise Manager for SOA Management & Monitoring had gotten a major overhaul. Because it is a lot of information there will be separate blogs to discuss all the features and because it is just to much to summaries hereby a short impression below.

SOA-Infra Dashboard

Enterprise Manager startpage shows soa-infra expanded:

SOA Suite 12c: EM Startpage

SOA Suite 12c: EM Startpage

On the SOA-Infra Dashboard page you can search for instances and create/save searches:

SOA Suite 12c: Search instances using SOA-Infra dashboard

SOA Suite 12c: Search instances using SOA-Infra dashboard

Deployed Composites are show with status and can easily be started and stopped:

SOA Suite 12c: Deployed Composites

SOA Suite 12c: Deployed Composites

Search instances with custom criteria or default filter:

SOA Suite 12c: Search Instances

SOA Suite 12c: Search Instances

Composite Sensor values are shown directly in the EM dashboard when you click on a instance:

SOA Suite 12c: Sensor Values

SOA Suite 12c: Sensor Values

You can also search on these Composite Sensors:

SOA Suite 12c: Search on Sensors

SOA Suite 12c: Search on Sensors

SOA Composite Dashboard

Composite Dashboard shows only components and services:

SOA Suite 12c: Composite Dashboard

SOA Suite 12c: Composite Dashboard

The Composite definition can be visually displayed:

SOA Suite 12c: Composite Definition visually in EM

SOA Suite 12c: Composite Definition visually in EM

By default no flow instances are show to give page a much needed performance boost:

SOA Suite 12c: Composite shows no instances by default

SOA Suite 12c: Composite shows no instances by default

When selecting a flow instance more details are show about faults:

SOA Suite 12c: Instance Details

SOA Suite 12c: Instance Details

And Sensor values:

SOA Suite 12c: Instance Sensor Values

SOA Suite 12c: Instance Sensor Values

And Composite dependencies:

SOA Suite 12c: Instance Dependencies

SOA Suite 12c: Instance Dependencies

The instance flow trace shows adapters in gray and SB integration:

SOA Suite 12c: Instance Flow Trace

SOA Suite 12c: Instance Flow Trace

SOA Composer

In the SOA composer you can add/edit composite sensor values, DVMs, Business Rules and other artifacts:

SOA Composer 12c: Composite Sensors

In the SOA Composer the Composite Diagram can looked at:

SOA Suite 12c: SOA Composer

SOA Composer 12c: Composite Diagram

 SOA Error Hospital

In the SOA-Infra dashboard (recoverable) faults are visual using a chart:

SOA Suite 12c: Error Hospital Dashboard

SOA Suite 12c: Error Hospital Dashboard

The flow instances tab shows faults that can be recovered, click on Error Hospital to recover them:

SOA Suite 12c: Recoverable Fault

SOA Suite 12c: Recoverable Fault

In Error Hospital tab faults can be recovered, with option to Bulk Recover:

SOA Suite 12c: Error Hospital Bulk Recover

SOA Suite 12c: Error Hospital Bulk Recover

During the recover attempt the number decreases:

SOA Suite 12c: During attempt count decreases

SOA Suite 12c: During attempt count decreases

Recovered Faults are shown in Green:

SOA Suite 12c: Recovered Faults are shown in green

SOA Suite 12c: Recovered Faults are shown in green

This blog may be updated if other cool features are discovered.
For full coverage check the other first look blogs.

The post SOA Suite 12c: First look at SCA Composite features appeared first on AMIS Technology Blog.


SOA Suite 12c: BPEL Inline Sub Processes or locally Reusable Chunks of BPEL process logic

$
0
0

imageAn in-line sub process can best be thought of as a callable scope. It is a scope that is not part of the normal process flow, but rather a unit of encapsulated logic that can be called zero, one or multiple times from anywhere within the BPEL process – even recursively from within itself. It is in effect very similar to a private member function in a Java Class or a procedure in the body of a PL/SQL package. Just like private member methods or functions help structuring a Java Class or PL/SQL package, so can subprocesses help organize a large BPEL process – even more than scopes already can.

An in-line sub process can define arguments to be passed in. These can be passed by reference, which means the sub process can alter their values as well. Additionally, the in-line sub process can access all global process variables. The in-line sub process is a scope which as such can define local variables and nested scopes, use partner links, have event handlers etcetera. At run-time, the subprocess code is re-entrant and re-usable – only one copy is stored in memory, even if it is called multiple times. However, on each call, it has a private scope for local and passed-by-value variables.

An in line sub process is created from a normal scope that is promoted using the context menu option Convert to sub process. At that time, at the location in the BPEL process where the scope used to be, a call to the sub process can be inserted. Later on, such calls can be added in other places as well. Of course the sub process can be further refined after its initial creation.

Note: In addition to the In-Line Sub Process, the BPEL component also supports stand-alone Sub Processes. These are defined in a separate file (with extension .sbpel) and appear as components in their own right in the composite overview. They can be called from multiple other BPEL components (but only from BPEL components). They cannot access global elements of these calling BPEL processes, unlike the in-line sub process. However, for every other intent and purpose, they act as if merged into the calling process. An important advantage of the stand-alone sub process, apart from its ability to be reused across multiple BPEL process components is the fact that because the sub process has its own definition file, developers can work in parallel on sub processes.

An in-line sub process can easily be created from a scope. Create for example a new scope called ReportError, somewhere in a BPEL process. Create or Copy an Assign activity (in the example called CopyValidationFaultToProcessingResults from the Fault handler on scope SchemaValidation) to the new scope ReportError.

image

Select the scope and click on the icon Convert to a Subprocess – or select that option from the context menu.

The dialog box appears to create the Inline Subprocess. Provide a name – such as ReportMessageToProcessingResults – and a label and comment (for documentation purposes)

image

Press OK to create the inline subprocess.

The scope ReportError has been replaced with a Call Activity that invokes the new sub process. In order to inspect and further edit the sub process, you have to select it in the dropdown list in the upper left hand corner, as shown in this screenshot.

image

Click on the global scope for the sub process. Next, click on the variables icon that displays as an x between parentheses: (x). Specify three variables for the sub process – for message code, message summary and description, each of type string.

image

Edit the Assign activity in the Sub Process. Take the values from the three [input]variables of the sub process to provide the values for the new ProcessResult element, as is shown here:

image

Set the flag insertMissingToData on each of the three copy rules, to have all elements in the nested XML structure specified in the target XPath expression constructed if they do not exist, instead of throwing a selectionFailure fault if the XPath expression does not return exactly one element.

Return to the main process and to the call activity that replaced the scope. Edit the call activity. Specify the values for the three input variables . See next figure for an example. Copy these values by value – because it is not our intention to have the sub process manipulate these values.

image

Next, copy the call activity and paste it at some other location in the BPEL process – to get a feeling for the reuse potential. In this example, it will call the sub process to report an incorrect length for the carrier element. Update the values passed to the sub process accordingly.

image

You may also want to use the call activity in the fault handlers in other scopes in the main BPEL process or in other in-line sub processes.

The post SOA Suite 12c: BPEL Inline Sub Processes or locally Reusable Chunks of BPEL process logic appeared first on AMIS Technology Blog.

SOA Suite 12c: Property window for inspecting and editing BPEL activities

$
0
0

Before release 12c, editing activities in a BPEL process was done in the wizard that could be activated by double clicking the activity or by selecting edit from the context menu on an activity. Alternatively, a developer could resort to the BPEL process source file to make changes to the definition of activities.

In 12c, the property inspector has been extended to also support editing the properties of BPEL activities. When the property inspector window is available, it will synchronize with the currently selected activity in the BPEL editor.

The property inspector is opened using the top menu action: Windows | Properties.

image

When we select a BPEL activity in the BPEL editor, the inspector recognizes the activity and adjusts its appearance to the properties defined for the activity:

image

Note: you can drag and drop any window in JDeveloper to a new location.

When a scope is selected, the property inspector will show the details for the scope, including its variables and catch activities. When the BPEL process as a whole is selected, the property inspector recognizes that too:

image

The post SOA Suite 12c: Property window for inspecting and editing BPEL activities appeared first on AMIS Technology Blog.

SOA Suite 12c: Getting started in 30 minutes

$
0
0

This blog will get you started with the Oracle SOA Suite 12C. We will install the SOA Suite, create a Hello World BPEL project, deploy it on the integrated weblogic server and test it with the http analyzer.

The first step is downloading the SOA Suite from OTN. Enter your Oracle Technology Network account, if you don’t have one you’ll need to create an account. Download the zip file to a temporary folder, in my case C:/TEMP.

image

While the file is being downloaded it is time to check upon your Java Development Kit version, a fairly recent JDK is needed before you can actually install the SOA Suite (for example I’m using 1.7.0_15). Check if you meet this prerequisite, if not install one. After this check if you have JAVA_HOME environment variable pointing to the JDK, if not create one.

image

When the SOA Suite has finished downloading unzip it. Open a command prompt as an administrator.

image

In the command prompt navigate to your temporary folder where you unzipped the download. Run the following command: %JAVA_HOME%\bin\java -jar fmw_12.1.3.0.0_soa_quickstart.jar

Follow the installation wizard. During the installation you’ll need to enter a Oracle Home, this is the location where JDeveloper will be installed. In the end of the wizard click install. The installation will take a while. After the installation is finished click on finish. JDeveloper will be started automatically.

image

The next step is configuring and starting the integrated weblogic server, this prevents having to wait for it later. After JDeveloper has started click on Window and then Application Servers. This will open the application servers view.

image

The first time you start the integrated server you need to create a domain, by right clicking on the IntegratedWebLogicServer and then Create Default Domain.

image

Enter a password for the weblogic user in the prompt, accept all other defaults.

image

Creating this domain will take a while. So for now let’s start creating the first process. Go back to Applications and click on New Application…

clip_image002

We want to create a SOA Applicaton. In the creation wizard enter a name for the application and project. Accept the defaults Standard Composite and Empty Composite, but do note the interesting Template and Subprocess options. The result should be something like the screenshot on the right.

clip_image002[4]clip_image004

Create a bpel process by dragging it from the components view on the right to the middle of the composite in the components column. Enter a name for the process and for the template select the Synchronous BPEL Process. Accept all the defaults, yes finally a default bpel 2.0 process.

clip_image006

After finishing this wizard you should see something like the below image.

image

Double click on the BPEL process so you can start editing it. Drag an assign, from the components view on the right, between the receiveInput and replyOutput.

imageimage

Double click on the assign. Select and drag the input (inputVariable) to the result (outputVariable).

image

Start editing the from expression, by right clicking on the from expression and choosing the Edit ‘from’ expression.

image

If you’ve accepted the defaults so far, it would be enough to replace the expression with something like this: concat(“Hello “, $inputVariable.payload/client:input)

image

Click on OK on both prompts. Now we are going to deploy the HelloWorld service to the integrated server. Right click on the project (in my case HelloWorld). Hover over Deploy and click on HelloWorld… During the deployment make sure Deploy to Application Server is selected and click on next. In the next screen check the box for Overwrite any existing composites with the same revision ID. This is not needed at the moment, but if you want to redeploy this project you can use the same deployment profile.

image

In the next screen make sure the IntegratedWebLogicServer is selected.

image

Click next and accept all the defaults on the next screen by clicking finish. After the deployment has finished go the Application Servers window. Go to HelloWorld process by following the path IntegratedWebLogicServer >> SOA >> DefaultServer >> default >>HelloWorld [Default 1.0]. Right click on helloworld_client_ep and on the prompt click on Test Web Service.

image

The http analyzer starts. Enter your name in the input and click on Send Request.

image

This concludes this blog about getting started with the SOA Suite 12c. Finding out what actually happened on the SOA Suite server when you ran the above test will be part of another blog named SOA Enterprise Manager which will follow shortly.

The post SOA Suite 12c: Getting started in 30 minutes appeared first on AMIS Technology Blog.

Opaque does not mean: just pass anything in. It has to be base64! JCA Adapters

$
0
0

I only realized just now that the checkbox Native format translation is not required (Schema is Opaque) in many of the JCA adapter (wizard)s that we use with SOA Suite and Service Bus does not mean that the opaqueElement can be fed with just any content whatsoever and it will pass it onwards.

image


I tried to do just that, and ran into various errors, such as

Caused By: ORABPEL-11101

Translation Failure.
Translation to native failed. IO Failure in translator.
IO failure because the   translator failed to   to copy InputStream to OutputStream. .
Check the error stack and fix the cause of the error. Contact oracle support if error is not fixable.
.
The data does not conform to the NXSD schema. Please correct the problem.

        at oracle.tip.pc.services.translation.xlators.opaque.OpaqueTranslator.translateToNative(OpaqueTranslator.java:35
0)
        at oracle.tip.adapter.jms.outbound.JmsProducer.translateToNative(JmsProducer.java:106)
        at oracle.tip.adapter.jms.outbound.JmsProducer.constructOutboundAdapterMessage(JmsProducer.java:201)
        at oracle.tip.adapter.jms.outbound.JmsProducer.execute(JmsProducer.java:339)

image

and in the stacktrace:

Caused By: com.sun.mail.util.DecodingException: BASE64Decoder: Error in encoded stream: needed 4 valid base64 characters
but only got 3 before EOF, the 10 most recent characters were: “5T12:00:12″
        at com.sun.mail.util.BASE64DecoderStream.decode(BASE64DecoderStream.java:256)
        at com.sun.mail.util.BASE64DecoderStream.read(BASE64DecoderStream.java:144)

image

As it turns out, whatever is fed to the opaque element in the opaque ‘schema’ should in fact be base64 encoded data! Not just any string or XML block – as I originally thought.

And as it also happens: it is not so simple taking any piece of text of XML and turning it into base64. There is no standard XPath function available to perform this encoding. (I have to research whether perhaps the native format translation in SOA Suite 12c can be used for this). There are several resources on the internet by friends and peers that explain how a BPEL Java Embedded activity can be created to do the job, or a Java Call out in Service Bus or even a custom XPath function:

Edwin Biemond on Java Embedded activity in BPEL for Base64 encoding http://biemond.blogspot.nl/2011/09/base64-encoding-in-oracle-bpel-11g.html

Maarten Smeets on a Custom XPath functions to do the Base64 encoding from within any component that can uses XPath: http://javaoraclesoa.blogspot.nl/2012/03/base64encode-and-base64decode-in-bpel.html 

The SOA Guy on a Java Call out from Service Bus – http://thesoaguy.com/?p=63

A very good introduction into Base64 is provided by Ramkumar Menon’s Blog: https://blogs.oracle.com/rammenon/entry/base64_explained

The post Opaque does not mean: just pass anything in. It has to be base64! JCA Adapters appeared first on AMIS Technology Blog.

Oracle SOA Suite 11g and 12c: Determining composite dependencies to the level of operations

$
0
0

In large companies, often there are many services and dependencies between services. It is important to track service dependencies in order to for example estimate the impact of changes. Design documents or architecture views can be used for this but as everybody knows, there is often a gap between theory and practice (design and implementation).

In this blog post I provide code to determine dependencies between composites to the level of operation calls. In order to achieve this, I’ll parse the composite.xml files, JCA files (used by adapters) and also the BPEL and BPMN files in order to determine the operations. The script can be used for SOA Suite 11g and 12c composites.

2014-09-16 19_06_22-PowerPoint Slide Show - [dependencies.pptx]

The above picture shows different parts of which a composite is composed and how they are linked. The script first determines references. The references specify which external services are called. Then by using wires, the relevant components are determined. Based on the component type, specific logic is used to extract the operation. Not shown in this picture is how database dependencies can also be determined by the script by parsing the JCA files specified in the reference. If you’re in a hurry, you can go to the ‘Executing the script’ part directly and skip the explanation.

Composites

This blog will focus on composites (which can contain components like BPEL and BPM) using the shared SOA infrastructure and not on for example the Service Bus. Composites use the Software Component Architecture (http://www.oasis-opencsa.org/sca) to wire different components together in a consistent way. Oracle uses XML files to describe composites, components and references. These files can easily be parsed and correlated.

Introduction composite.xml

The main file describing a composite is the composite.xml file. Below is a small sample of a HelloWorld composite containing a single component, a BPEL process.
composite.xml
As can be seen, the composite contains properties, services, component definitions and wires which link components to either services or references. This composite has one service: helloworld_client_ep and no references.

Web service references

When I create a new composite which calls this one (HelloWorldCaller), an example can be seen of a reference in the composite of the newly created process.

A reference

This reference contains information on the development time WSDL to be used (ui:wsdlLocation) and the concrete binding at runtime (binding.ws). The ui:wsdlLocation should of course be an MDS path in a production environment (see https://blogs.oracle.com/aia/entry/aia_11g_best_practices_for_dec).

The name of the service to be called can be abstracted in various ways from for example the WSDL path if the service is hosted on the SOA infrastructure. On different components the URL can be manually set. Since the method to determine the service name differs per customer/technology, I will not further elaborate on this (service virtualization is a best practice). You can however in most cases use the composite.xml file to determine the service called. This is required in order to link services together, which is necessary in order to visualize dependencies. In my script I’ve used a method to determine the service name from the service WSDL: wsdl_to_servicename.

Determining the operation for BPEL processes

The operation is specified in the invoke action inside a BPEL process. The invoke action partnerLink attribute contains the name of the partnerlink. This partnerlink name corresponds to the name of the reference in the composite.xml. This can be used to select specific operations.

Determining the operation for BPMN processes

BPMN processes are structured differently then BPEL processes. Here Conversations are defined in the BPMN XML file. The Conversations are referred to by Conversationals which have a ServiceCallConversationalDefinition. This definition contains the operation which is called.

JCA references

JCA references are references which call JCA adapters such as the JMSAdapter, the DbAdapter or other adapters. The references in this case are not webservices and the binding in the composite looks a bit different.

CaptureReferenceDb

In this case, the important information is contained in the file referenced by the binding.jca element. The JCA file specified contains the following information in my case.

CaptureReferenceDbJCA

From this JCA file, I can determine the connection factory, package and procedure name. Do keep in mind that you should check if the adapter=”db” and the interaction-spec className attribute is oracle.tip.adapter.db.DBStoredProcedureInteractionSpec if you want to check the PackageName property. Other JCA adapters can be parsed in a similar way.

Executing the script

The script can be downloaded here: https://dl.dropboxusercontent.com/u/6693935/blog/soaparser.zip

In order to execute it, you need Python 2.7 (I have not checked if it works with higher or lower versions). I have used PyDev plugin in Eclipse Luna to develop it. I’m no expert Python programmer so do not use this script as an example on how you should write correct Python scripts. You need to change the path to the root where composites can be searched for recursively.

As you can see in the bottom right part of the screenshot, my testcase contained three services. HelloWorld, HelloWorldCaller which called the process operation on HelloWorld and HelloWorldDb which called the database procedure TESTUSER.UTILS.GET_SYSDATE

2014-09-16 19_31_25-PyDev - SOAParser_nl_amis_smeetsm_soaparser.py - Eclipse

Conclusion

In this blog I have supplied a script to analyse composite dependencies. Some reservations are in order though.

Custom code
Of course, when using interesting specific custom logic to dynamically determine calls at runtime, code to determine dependencies also needs to be written specifically for the implementation. In such cases this script will not suffice.

No runtime dependencies
The script does not analyse a runtime situation but code present in a certain directory. If services have their own independent lifecycle, there might not be a specific directory which contains the state of a complete environment.

No BPEL 10g
For BPEL 10g, the bpel.xml file and the adapter WSDL files can be analyzed in a similar way. At the time of writing, I hope not many customers are still using 10g though.

Further

The method of parsing code to determine dependencies can also be used to extent to other technologies. Such as frontend applications. They can be linked to the services providing a more complete image of the application landscape.

When using a simple visualization tool such as Graphviz (http://www.graphviz.org/) you can visualize the dependencies. It requires the dependencies to be provided in a specific format, the DOT language. This language is relatively easy to generate from a script. Such an image can be very interesting to developers, architects and designers to determine who uses a certain service.

The post Oracle SOA Suite 11g and 12c: Determining composite dependencies to the level of operations appeared first on AMIS Technology Blog.

Viewing all 24 articles
Browse latest View live